Install Node.js and Deploy Application on cPanel/WHM Server
Leave a comment on Install Node.js and Deploy Application on cPanel/WHM Server
Node.js is an open-source server environment that runs JavaScript, allowing you to build scalable web applications. In this blog, we are going to discuss how to install Node.js on a WHM/cPanel server and how to deploy the application from cPanel.
This method assumes you have full root access to your server (i.e., a VPS or dedicated server) and that you have cPanel/WHM (paid control panel) installed on your server. Please note that RackNerd’s shared hosting plans come with Node.js pre-installed and include a Node.js Selector in cPanel. This tutorial is ONLY applicable to VPS or Dedicated server hosting clients with cPanel hosting control panel installed.
Previously, cPanel did not support Node.js, and at that time, we either needed to install Node.js manually, or else, we needed to install CloudLinux on the server with cPanel to get Node.js support. Manually installed Node.js cannot provide a user-friendly interface to manage the application, and if we decided to use CloudLinux for getting Node.js support as well as a user-friendly interface, we had to spend $10 to purchase the CloudLinux license. cPanel started supporting Node.js from version 80 onwards, so we can now install Node.js on the server via EasyApache4 easily.
We need to first prepare the server by installing Node.js on the server before deploying the application to the server.
Installing Node.js on the server
We need root access to the server for installing Node.js, and we can perform the installation using either of the following two methods:
Method 1: From Terminal
You can run the following command from the terminal as the root user for installing node.js on the server.
yum install ea-ruby27-mod_passenger ea-ruby27-ruby-devel ea-apache24-mod_env ea-nodejs16 Method 2: From WHM
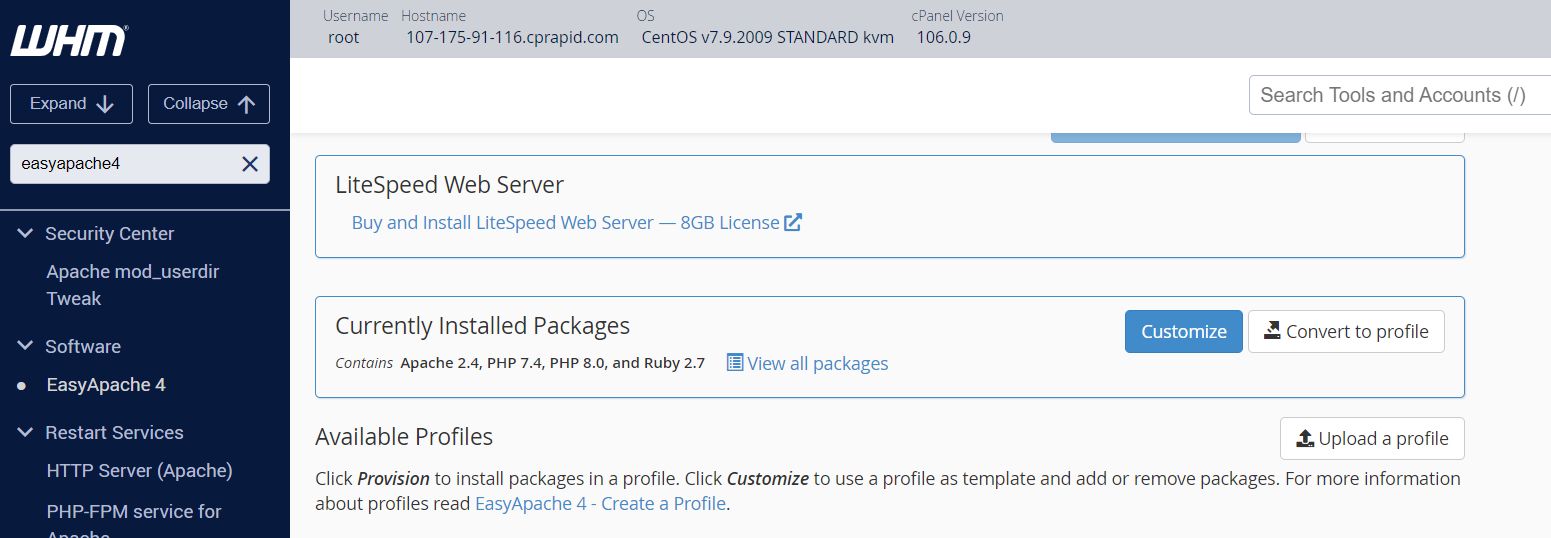
We can also install the required packages and Node.js from WHM >> Home >> Software >> EasyApache4. When accessing EasyApache4 from the WHM panel, you will find a Customize button corresponding to the Currently Installed Packages section or Current Profile section. Simply click on the Customize button.
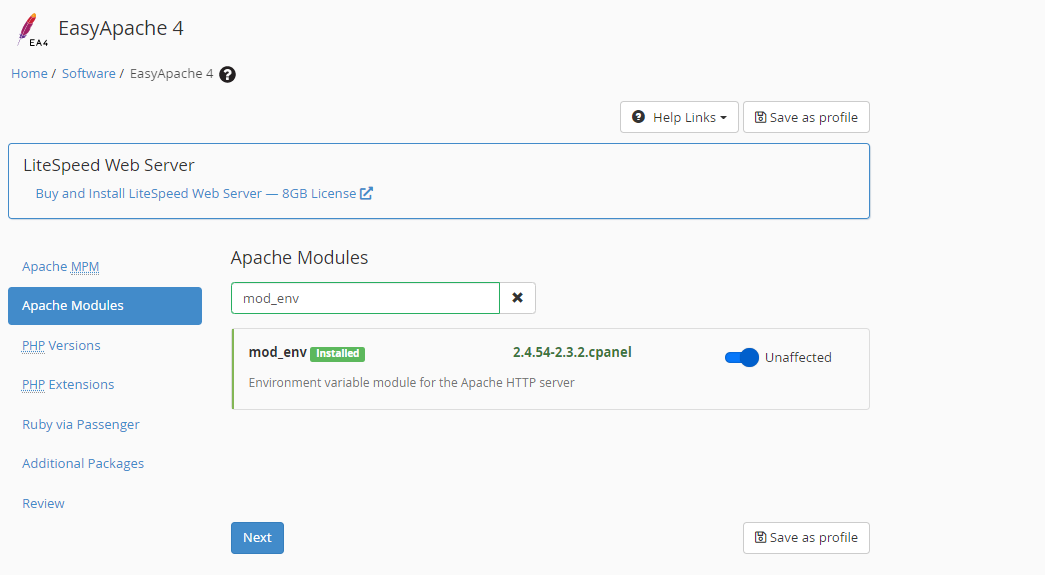
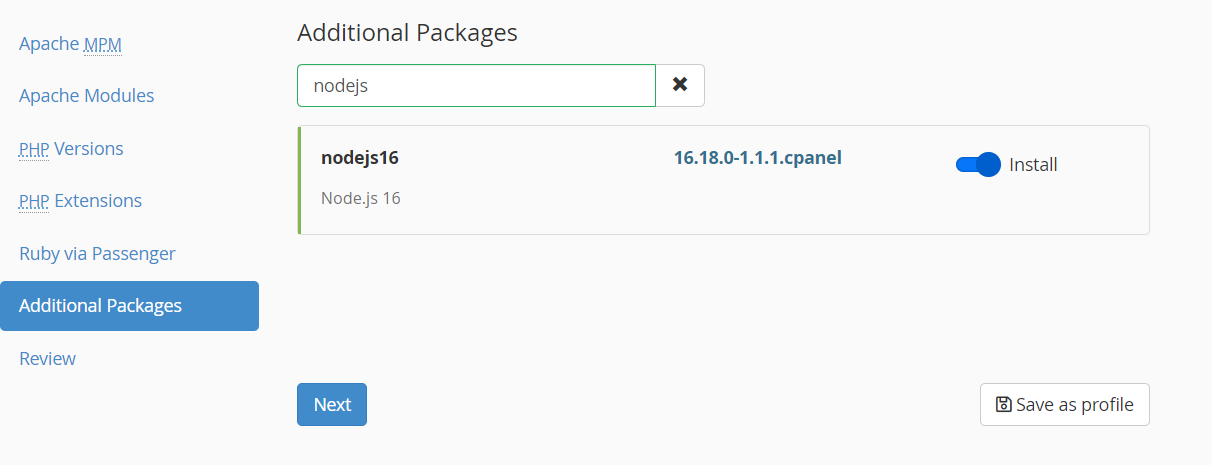
When clicking the Customize button, you will get options to install Apache MPM, Apache Modules, PHP versions, PHP Modules, Ruby via Passenger, and other additional packages. You need to search for mod_env in the Apache Modules and toggle the button on the right side to include this package when configuring.
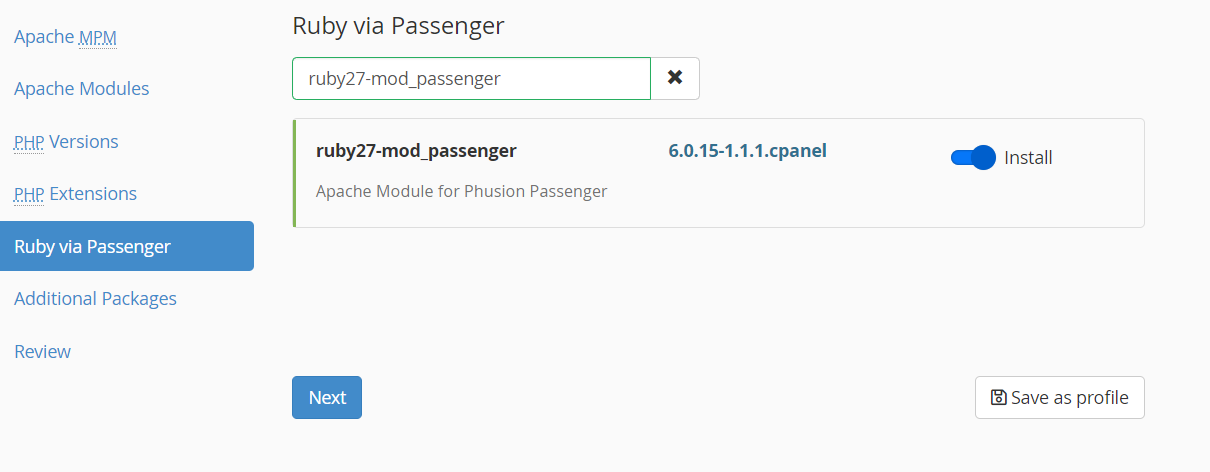
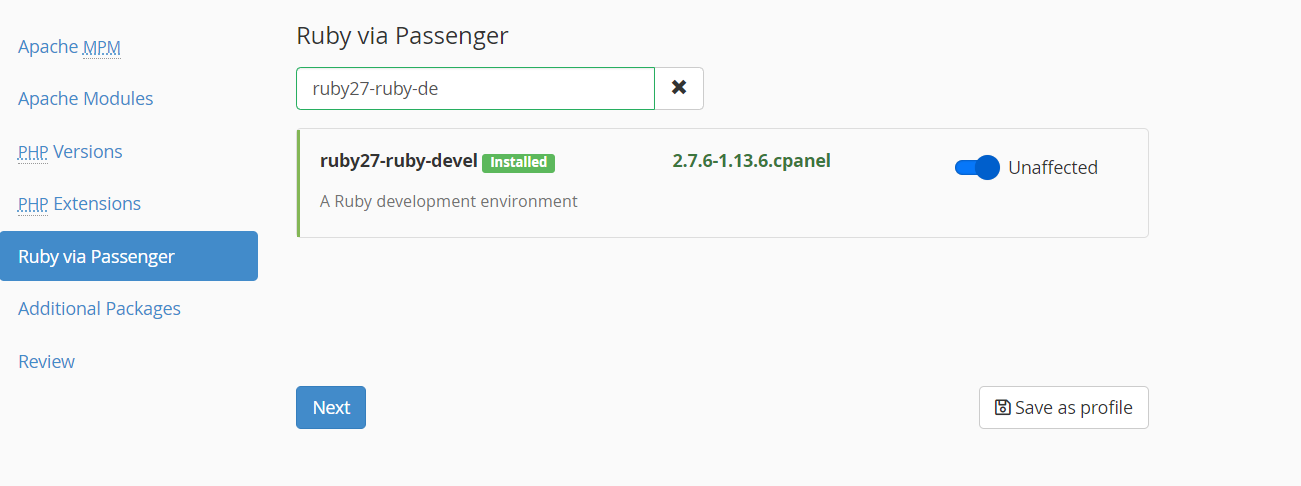
Similarly, toggle the buttons corresponding to the packages ruby27-mod_passenger and ruby27-ruby-devel under Ruby via Passenger, and also for the package nodejs16 under Additional packages.
Now, you need to click on the Review option on the left side so that EasyApache4 can prepare the selected packages for review. After reviewing the packages, you will find the Provision button at the bottom. You have to click on the blue Provision button for the system to install the selected packages. Please wait a moment for the provision process to complete, and Node.js will be installed when the process finishes.
Deploy the Application
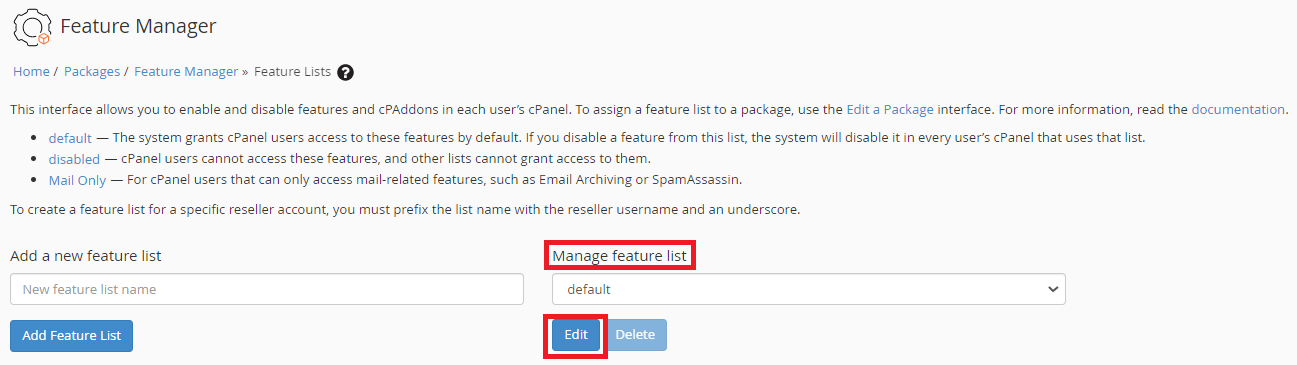
Customers can deploy the Node.js application from cPanel using the Application Manager. So, first, we need to enable the Application Manager in the feature list so that clients can access the Application Manager option in cPanel. To enable the Application Manager, access the WHM panel and navigate to WHM >> Home >> Packages >> Feature Manager. Select the required feature list from the Manage Feature List on the right side, and then click on the Edit button.
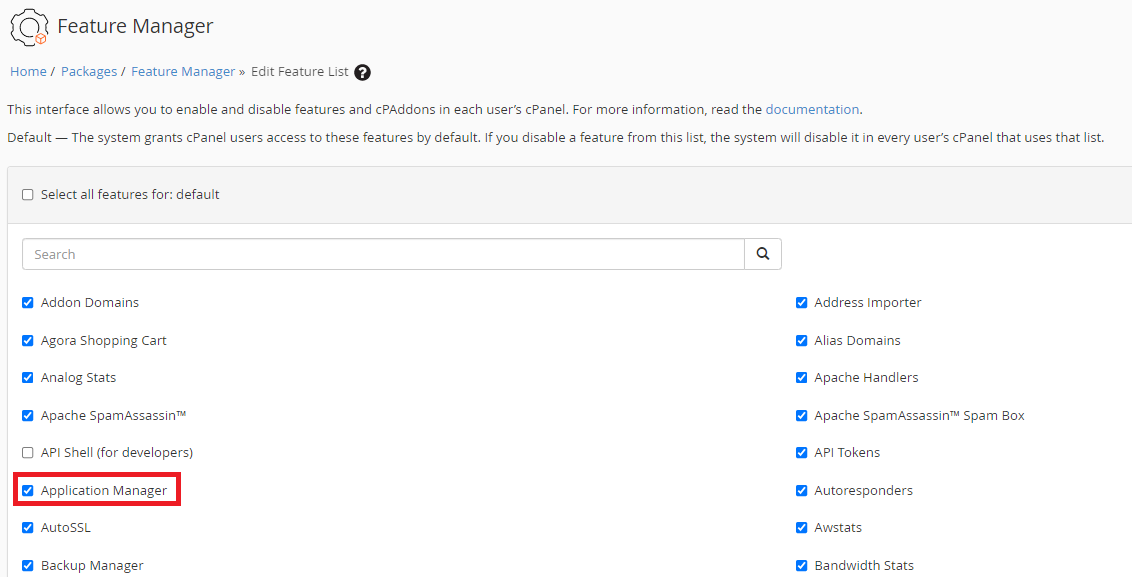
Now, you can see the feature list, and you need to check the checkbox on the left-hand side of the “Application Manager” feature and save the changes.
Now, customers can find the “Application Manager” option under cPanel >> Home >> Software >> Application Manager. Next, you need to create an application directory anywhere under the home directory and create/upload the startup file in the application directory. We typically use “app.js” as the startup file. It should resemble the following example:
const http = require('http')
const hostname = '127.0.0.1';
const port = 3000;

const server = http.createServer((req, res) => {
  res.statusCode = 200;
  res.setHeader('Content-Type', 'text/plain');
  res.end('Hello World! NodeJS \n');
});

server.listen(port, hostname, () => {
  console.log(`Server running at http://${hostname}:${port}/`);
});
If you created a startup file with a different name, you must edit the Apache configuration file for that domain name and define the startup file within the Apache configuration file. To do this, you’ll need to create an include file and then rebuild httpd.
To specify the new filename, perform the following steps:
- Create the /etc/apache2/conf.d/userdata/ssl/2_4/user/mysite.com.conf file with a text editor.
- Add the PassengerStartupFile variable and the filename as its value in a virtual host container. This will resemble the following example:
DocumentRoot /home/user/public_html
PassengerStartupFile index.js
PassengerAppType node
PassengerAppRoot /home/user/Application_Directory
In the above example, we defined “index.js” as the startup file.
- You need to rebuild the httpd conf and you can do this by running the following command
/usr/local/cpanel/scripts/rebuildhttpdconf- Restart Apache.
/usr/local/cpanel/scripts/restartsrv_httpdTest the Application
After creating the startup file in the application’s directory, you can test it from the terminal as a user. For that:
- Access the server via SSH as the cPanel User
- Run the command “/opt/cpanel/ea-nodejs16/bin/node app.js”. Then you will get a result like “Server running at http://127.0.0.1:3000”

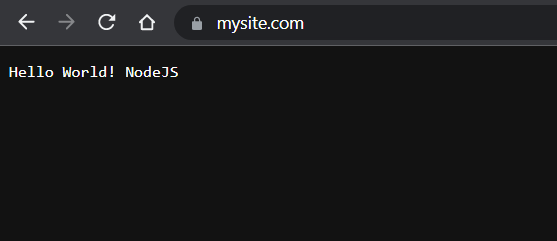
- Now, open a different tab and run the command “curl http://127.0.0.1:3000”. You will get the result “Hello World! NodeJS” as per our app.js file.

Register the Application
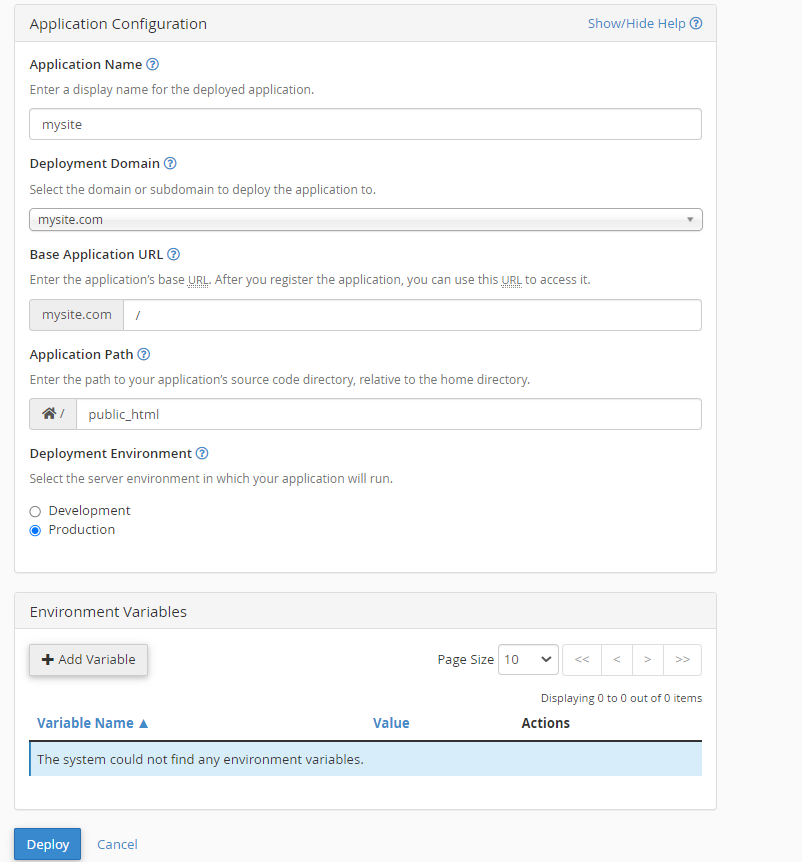
If everything is fine, you can close both tabs in the terminal and register the application by going to cPanel >> Home >> Software >> Application Manager >> Register Application option. In the following example, we are using the “app.js” file uploaded in the “public_html” directory and are going to associate the domain name “mysite.com” with the application. After filling out the details, you need to click on the Deploy button.
Finally, everything is set, and you can load the domain in your favorite browser to confirm that everything is working fine.
Conclusion
Deploying a Node.js application on a WHM/cPanel server has become more straightforward and user-friendly thanks to cPanel’s support for Node.js starting from version 80. We’ve walked you through the essential steps to set up Node.js on your server and deploy your application seamlessly. From installing the necessary packages via EasyApache4 to enabling the Application Manager in cPanel for your customers, we’ve covered the entire process.
With these steps in place, your customers can easily manage and deploy their Node.js applications, making it a hassle-free experience. Whether you’re a server administrator or a cPanel user, the ability to harness the power of Node.js for your web applications is now at your fingertips. So, go ahead and explore the possibilities of Node.js on your WHM/cPanel server, and watch your web projects thrive with speed and efficiency. Happy coding!