How to Renumber IP Address on a Dedicated Server
Leave a comment on How to Renumber IP Address on a Dedicated Server
This blog post dives into how to renumber IP addresses on servers such as CentOS, Ubuntu and Windows, providing you with a comprehensive guide to navigate this technical task with confidence.
Note: This tutorial is applicable to bare metal dedicated servers only. VPS services typically have its network service automatically managed by the VPS control panel. In the case of a bare metal dedicated server, we recommend having IPMI access ready on standby in the event of a misconfiguration.
CentOS / RHEL Variants
Relevant for these operating systems:
- CentOS 6
- CentOS 7
- CentOS Stream 8
- AlmaLinux 8
- RockyLinux 8
How to Renumber your IP Address on CentOS or other RHEL variants – via SSH (Secure Shell):
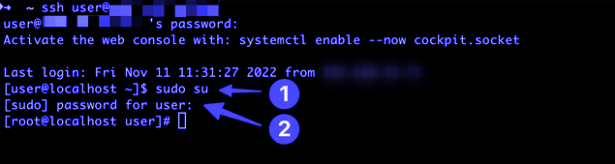
To start, access your server via SSH. Root permissions are necessary to complete the required steps for renumbering the server. If you are not logging in as username root, once logged in, you can utilize the “sudo su” command to become the root user and proceed. Input the root password for the server when prompted.
Important Reminder: Pay close attention to the instructions in this guide. The root user has the ability to modify all system settings, and errors could result in server issues.
If you are already logged in as root, you can skip the above step. Moving forward, our next step involves finding the appropriate configuration file for adjustments.
If you are running on CentOS Stream 8, AlmaLinux 8, or RockyLinux 8, the first step is to ensure you have network-scripts installed. Skip this step if you are running on CentOS 6 or CentOS 7. To do this, run the below command:
yum -y install network-scripts
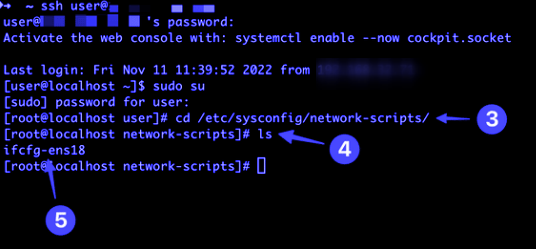
On CentOS, network configuration files are situated in the directory “/etc/sysconfig/network-scripts”.
To access this directory, use the command “cd /etc/sysconfig/network-scripts”, and utilize “ls” to display the files within.
You’ll typically notice multiple files in this folder, although in the below screenshot example, we only have one file name. If you notice multiple ifcfg-* files, run the below command in order to determine which to work with:
ip -4 route show default | awk ‘{print $5}’
The above command will inform you the main running network interface on your server that is in use. By running the above command, you’ll know which network interface file to work with.
In our case, you’ll observe a file named “ifcfg-ens18”, which corresponds to the configuration of our network interface “ens18”. The network configuration file name may vary depending on your set up, so it’s best to utilize the above mentioned command to determine which network interface you should be editing.
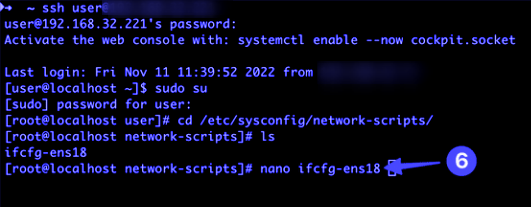
We’ll conclude editing this configuration file using the nano editor. In our example, you can achieve this by using the command “nano ifcfg-ens18”. Be sure to substitute “ifcfg-ens18” with the appropriate filename for your network interface. For those with advanced familiarity, the vi editor might be a preferred alternative to using nano.
Subsequently, use the arrow keys on your keyboard to navigate to the designated section below. Modify the IP address to match the newly assigned one. The subnet mask (which is 29 in this instance) will remain unaffected. Additionally, remember to update the gateway address.
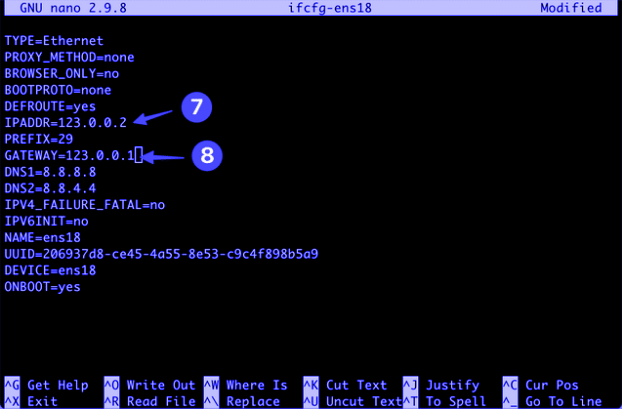
If you’re uncertain about the new default gateway, just add 1 to the value of the last segment of your recently allocated subnet. For instance, with a subnet allocation of 1.2.3.0/29, the assigned default gateway would be 1.2.3.1, and the first usable IP address (IPADDR) becomes 1.2.3.2. The subnet mask remains unchanged.
To save the modifications, use the following key sequences:
– Control + O, and then press Enter (to save the file)
– Control + X, to exit nano and return to the command line
Now, we’ll implement the updated IP address in the below steps. Be aware that this step will lead your server to become unresponsive on the old IP address and switch to the new IP address. It will also cause your SSH session to disconnect.
For CentOS Stream 8, AlmaLinux 8, or RockyLinux 8:
Be sure to add “NM_CONTROLLED=no” to the last line in your network configuration file above. This will disable the NetworkManager service on your server and tell your server to use network-scripts instead.
When you’re prepared to proceed, run the following commands to finalize the changes:
systemctl stop NetworkManager
systemctl disable NetworkManager
systemctl restart network
For CentOS 7 or CentOS 6:
When you’re ready to move forward, use the “service network restart” command to complete the change.
The server’s response will shift from the old IP address to the new one, leading to a loss of your SSH connection.
Subsequently, re-establish a connection to your server through SSH using the new IP address. Make sure to address any additional configuration changes required, such as adjusting settings for web servers, mail servers, or other server applications.
If you require further assistance, don’t hesitate to reach out to our support team.
Ubuntu Server
Relevant to the subsequent operating systems:
- Ubuntu Server 22.04 LTS (and 22.10)
- Ubuntu Server 20.04 LTS (and 20.10)
- Ubuntu Server 18.04 LTS (and 18.10)
How to Renumber your IP Address on Ubuntu – via SSH (Secure Shell):
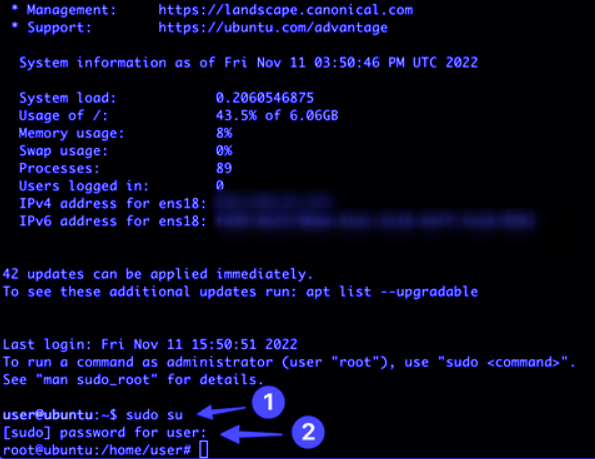
Start by logging into your server via SSH. To execute the necessary steps for renumbering the server, root permissions are needed. Upon logging in, if you are not logging in as root, you can utilize the “sudo su” command to become root and proceed. When prompted, input the root password for the server. It’s crucial to meticulously adhere to the instructions in this guide, as the root user can modify all system settings, and inaccuracies could result in disruptions to your server.
Moving forward, we’ll modify the Netplan configuration, which handles network setup in Ubuntu. For this purpose, we’ll employ the nano editor in this guide. Those more experienced might opt for vi. You’ll find the Netplan configuration at “/etc/netplan” with the default name being “00-installer-config.yaml”. To initiate the editing process, input the command “nano /etc/netplan/00-installer-config.yaml” and press “Enter”. This action will open the configuration file in edit mode.

Navigate to the indicated area using the arrow keys on your keyboard. Update the IP address to match the newly assigned one. Keep the subnet mask unchanged (in this scenario, /29). Don’t forget to modify the gateway address as well.
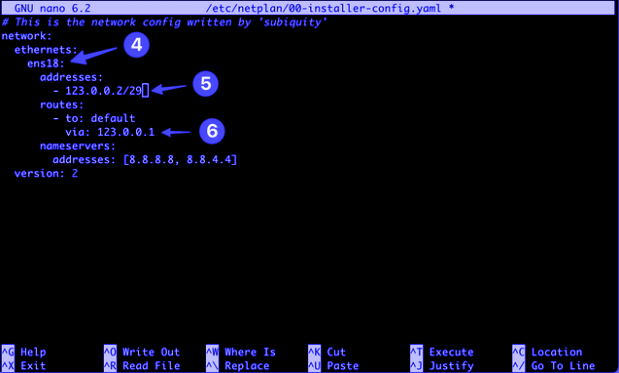
For Ubuntu based systems, you’ll want to enter the main IP followed by the CIDR size, in this case a /29. Ubuntu’s Netplan will then automatically calculate the netmask and subnet based on this /29 value that you enter following your IP address.
For saving the changes, utilize the following key combinations:
– Press Control + O, then hit Enter (to save the file).
– Press Control + X to exit nano and return to the command line.
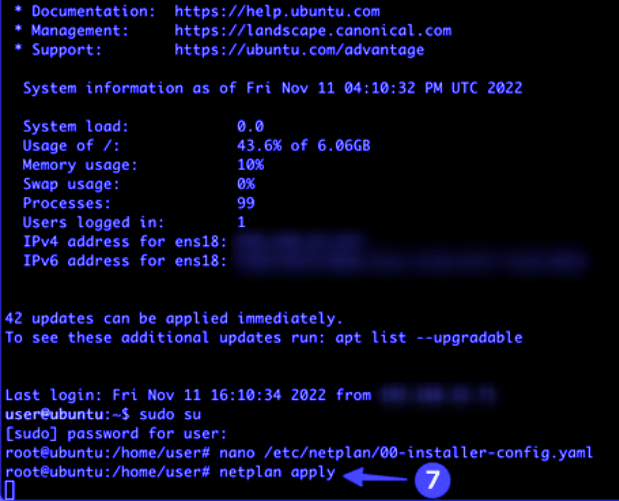
Now, we can implement the updated IP address. Keep in mind that this action will make your server unresponsive on the old IP address, switching to the new one. This step will also cause your SSH session to disconnect. When you’re prepared to proceed, use the command “netplan apply” to finalize the change. Your server will halt its response on the old IP address and start responding on the new IP address, leading to the loss of your SSH connection.
Lastly, re-establish a connection to your server via SSH using the new IP address. Make sure to finalize any remaining configuration adjustments that might be required, such as modifying settings for web servers, mail servers, or other server applications.
Windows Server
This information is relevant for these operating systems:
- Windows Server 2022
- Windows Server 2019
- Windows Server 2016
- Windows Server 2012
How to Renumber your IP Address on Windows using RDP
Begin by connecting to your server through the Microsoft Remote Desktop client. You’ll need to log in using either the Administrator account or a user account with Administrator permissions.
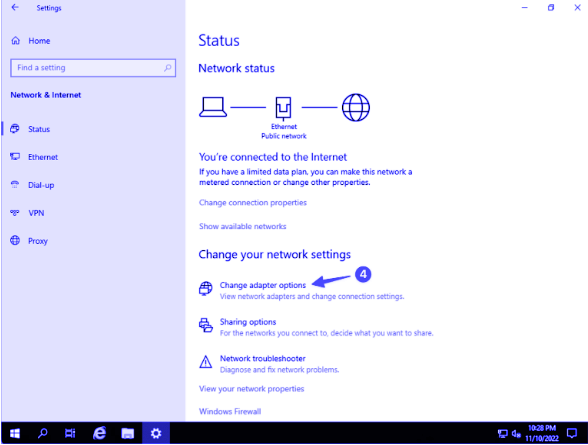
Once you’re connected, locate and click on the “Start” button, and then access the “Settings” option.

Now, access the “Network & Internet” settings section.

Choose “Change adapter options”, and then access the settings of your network interface by double-clicking on the adapter for your network connection. This adapter’s name might differ, but it should be labeled as “Ethernet” or something similar. If you’re uncertain, please reach out to support to help you identify the right network adapter.
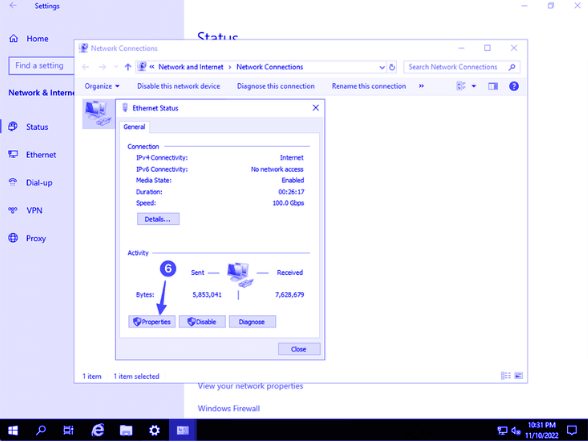
The network status window will pop up. Tap the “Properties” button.
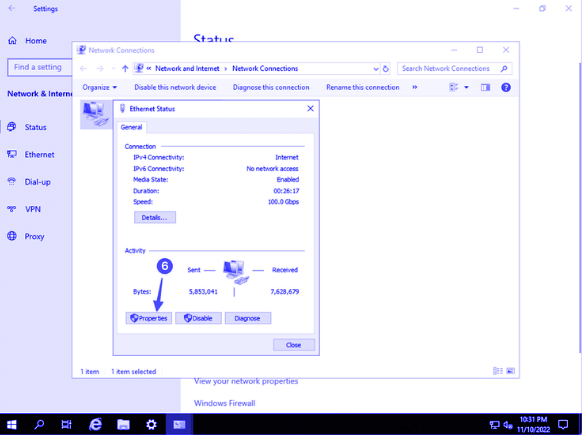
After that, choose “Internet Protocol Version 4 (TCP/IPv4)” from the list, and click “Properties” to adjust the IPv4 settings for the server.

You can proceed to input the new IP address given by support. Ensure to update both the IP Address and the Default Gateway.
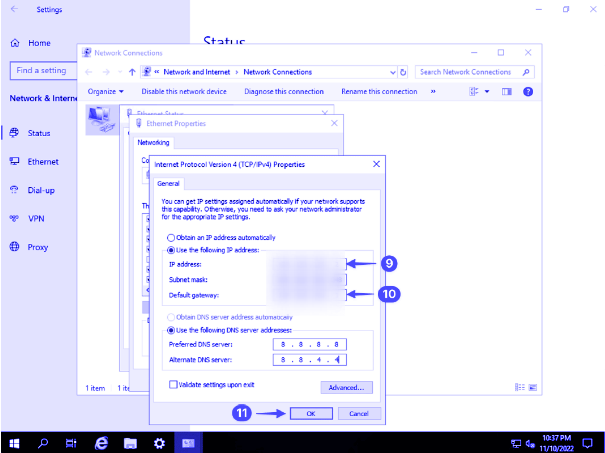
In case you’re uncertain about the new Default Gateway to utilize, simply add 1 to the value of the last segment of your freshly allocated subnet. For instance, if your subnet allocation is 1.2.3.0/29, the assigned default gateway is 1.2.3.1, and your initial usable IP address is 1.2.3.2. The subnet mask remains unaltered (for a /29, it’s 255.255.255.248).
After successfully completing the aforementioned step, the subsequent action will lead the server to cease responding on the old IP address and instead commence responding on the new IP address. If you’re prepared to finalize this task, acknowledging that there might be up to 1 minute of service interruption as Windows implements the new configuration, you can complete the change by clicking “OK”.
Side Note: At this juncture, your server will halt its response on the old IP address and commence responding on the newly designated and configured IP address. To further reconfigure any software applications that may require adjustment (i.e. web server software, DNS servers, software configuration files, etc), please reconnect to the server using the new IP address.
Congratulations! You’ve successfully renumbered your server’s IP address.