Host Your Personal Cloud with Nextcloud on a VPS
Leave a comment on Host Your Personal Cloud with Nextcloud on a VPS
In today’s digital world, data privacy and accessibility have become more important than ever. While services like Google Drive and Dropbox are convenient, they come at the cost of surrendering control over your data. If you’ve ever wished for a secure, private, and fully customizable cloud solution, setting up your own Nextcloud instance on a VPS might be the perfect answer.
What is Nextcloud?
Nextcloud is an open-source, self-hosted cloud storage solution that lets you store, share, and access your files, contacts, calendars, and more, from anywhere. It’s like having your own personal Dropbox, but you control where and how your data is stored.
Why Use a VPS for Nextcloud?
A Virtual Private Server (VPS) offers an affordable and flexible way to host applications like Nextcloud. Compared to shared hosting, a VPS provides better performance, greater control, and improved security. With a VPS, you can choose your own operating system, configure software as you like, and scale resources as your needs grow.
Prerequisites
- A VPS with at least 2 GB RAM and sufficient disk space (depending on how much data you plan to store)
- A domain name is suggested for convenience but is not required.
- Basic Linux command-line skills
Step 1 – Choose and set up your VPS
Select a reputable VPS provider (such as DigitalOcean, Linode, or Vultr) and deploy a Linux server Ubuntu 22.04 LTS is a popular choice for stability and support.
Step 2 – Update your system
sudo apt update && sudo apt upgrade -y
Step 3 – Set up PHP, MariaDB (or MySQL), Apache, and the necessary PHP modules:
sudo apt install apache2 mariadb-server libapache2-mod-php php php-mysql php-gd php-xml php-mbstring php-curl php-zip php-intl php-bcmath php-imagick unzip -y
Step 4 – Configure the database
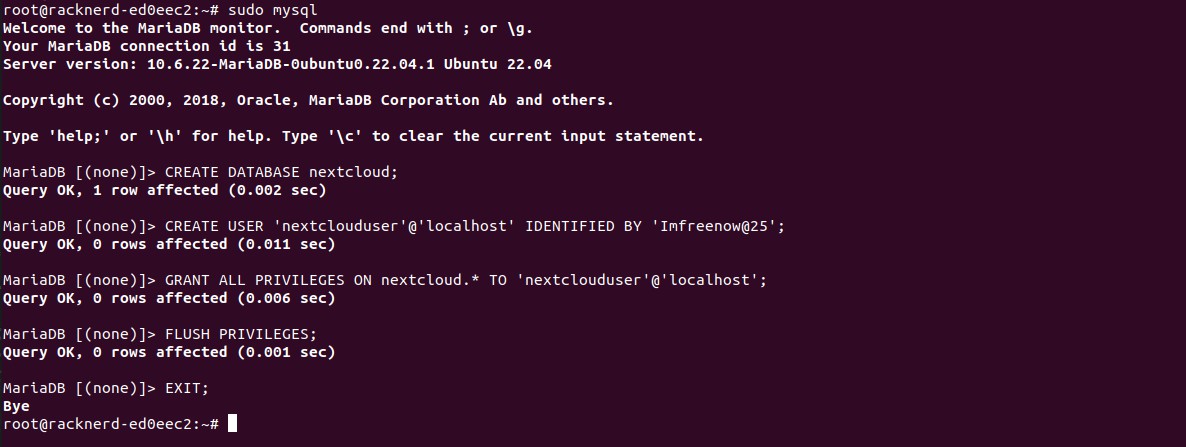
sudo mysql
CREATE DATABASE nextcloud;
CREATE USER 'nextclouduser'@'localhost' IDENTIFIED BY 'your_strong_password'; GRANT ALL PRIVILEGES ON nextcloud.* TO 'nextclouduser'@'localhost';
FLUSH PRIVILEGES; EXIT;
Step 5 – Download and extract Nextcloud

wget https://download.nextcloud.com/server/releases/latest.zip unzip latest.zip
sudo mv nextcloud /var/www/html/
sudo chown -R www-data:www-data /var/www/html/nextcloud sudo chmod -R 755 /var/www/html/nextcloud
Step 6 – Configure Apache
Create a new configuration file:
sudo nano /etc/apache2/sites-available/nextcloud.conf
And add the following:
<VirtualHost *:80>
ServerAdmin [email protected] DocumentRoot /var/www/html/nextcloud/ ServerName yourdomain.com
<Directory /var/www/html/nextcloud/> Options +FollowSymlinks AllowOverride All
Require all granted
</Directory>
ErrorLog ${APACHE_LOG_DIR}/error.log
CustomLog ${APACHE_LOG_DIR}/access.log combined
</VirtualHost>
(Please make sure to replace the appropriate lines with your actual names) Enable the site and necessary modules:
sudo a2ensite nextcloud.conf
sudo a2enmod rewrite headers env dir mime setenvif sudo systemctl restart apache2
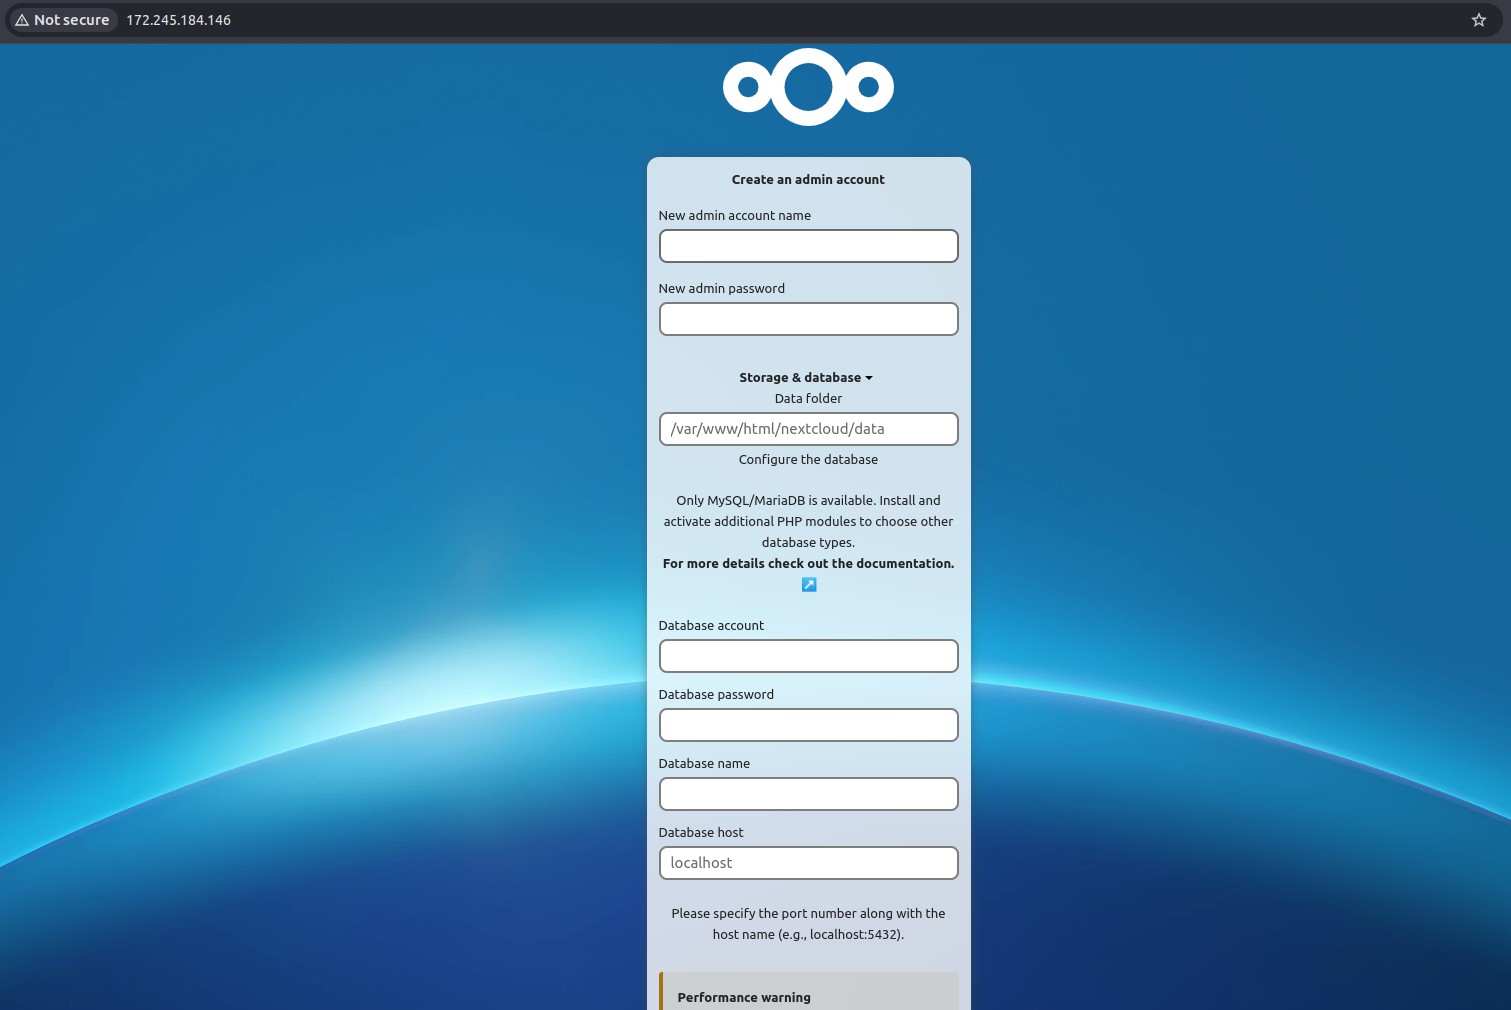
Step 7 – Complete the setup via web browser
Visit ‘http://yourdomain.com’ in your browser. The Nextcloud setup page will appear, where you can enter the database credentials you previously configured and create an admin account.
Benefits of Hosting Your Own Nextcloud
- Control and privacy: You retain ownership of your data.
- Cost-effective: Avoid recurring cloud storage fees.
- Expandable: Add features like calendars, contacts, and collaborative document editing.
- Cross-platform: Use web, mobile, and desktop clients to access your files.
Conclusion
Hosting your own Nextcloud on a VPS is an empowering project that gives you full ownership over your data while still enjoying the convenience of a cloud service. With a bit of setup effort, you can break free from commercial providers and create a truly private cloud tailored to your needs.