How to Transfer Your WordPress Website Away From SiteGround
Leave a comment on How to Transfer Your WordPress Website Away From SiteGround
If you’re a SiteGround user looking to migrate away from SiteGround, you’ve likely experienced the unique challenges posed by their custom hosting control panel. While other providers opt for renowned control panels like cPanel, SiteGround’s custom approach can leave you feeling somewhat constrained when it comes to being in control of your data.
A bit about SiteGround
SiteGround distinguishes itself by using a custom hosting control panel, a departure from the industry norm of using renowned control panels like cPanel. While this may help in cost-saving for SiteGround as a company, it often leaves users feeling locked in, as there is no seamless migration path.
Unlike other providers where you can generate a full backup using standard control panels like cPanel, SiteGround’s proprietary panel complicates the migration process, which is why in this blog post, we’ll guide you on how to successfully migrate your WordPress website from SiteGround to any other hosting provider, like RackNerd as an example, using the Duplicator Plugin for WordPress.
Why Migrate Away from SiteGround
SiteGround’s decision to use a custom control panel can make users feel confined, limiting their ability to migrate seamlessly to other hosting providers. While renowned control panels like cPanel allow for straightforward backups and restores on various hosting platforms, SiteGround’s proprietary panel makes the process more complicated.
Why Use Duplicator Plugin for Migration
If you find yourself needing to change hosting providers or domain names, or if you want to create a staging environment for your WordPress website, the Duplicator plugin is a powerful tool. This plugin simplifies the migration process, eliminating the complexities associated with changing the installation path and URLs in the database.
How to Migrate WordPress with Duplicator Plugin
Before you begin the migration process, make sure you have the WordPress admin dashboard login credentials, Control panel access (cPanel, Plesk, etc.) and FTP login credentials for domain.com.
In case your host lacks a control panel, ensure you have access to the database server (MySQL, MariaDB, etc.). Now, let’s get started!
Step 1: Install Duplicator Plugin
To install the Duplicator plugin, access the WordPress admin dashboard of the domain (myblog.com) you intend to migrate to a different host. Here are the steps to follow:
Start by navigating to the WordPress Dashboard, then proceed to the “Plugins” section. Here, select “Add New“. In the top-right corner, locate a search box, and type in “Duplicator.” Among the search results, you’ll come across “Duplicator – WordPress Migration Plugin“. Click on “Install Now” to install the plugin. After the installation is complete, click on the “Activate” button to activate it.

Step 2: Creating the Source Archive
After installing and activating the Duplicator migration plugin, you can create a new package by navigating to the “Duplicator” option in the left-side menu. From there, select “Packages” and click on the “Create New” button located at the top-right corner of the screen. This action will kickstart the process of creating a new package for your website migration.

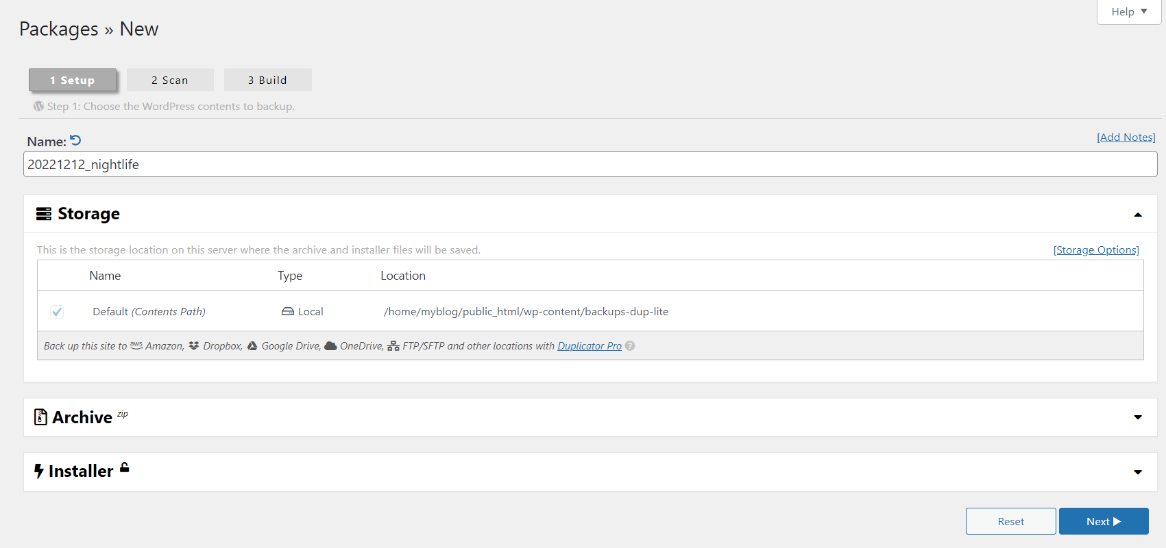
Creating a new Duplicator Archive or backup for your website is a three-step process: Setup, Scan, and Build, and it’s not as complicated as it might sound.
The Three Phases of Archive Creation
First, in the Setup phase, all you need to do is click the “Next” button without making any changes. This will automatically scan your entire WordPress installation.
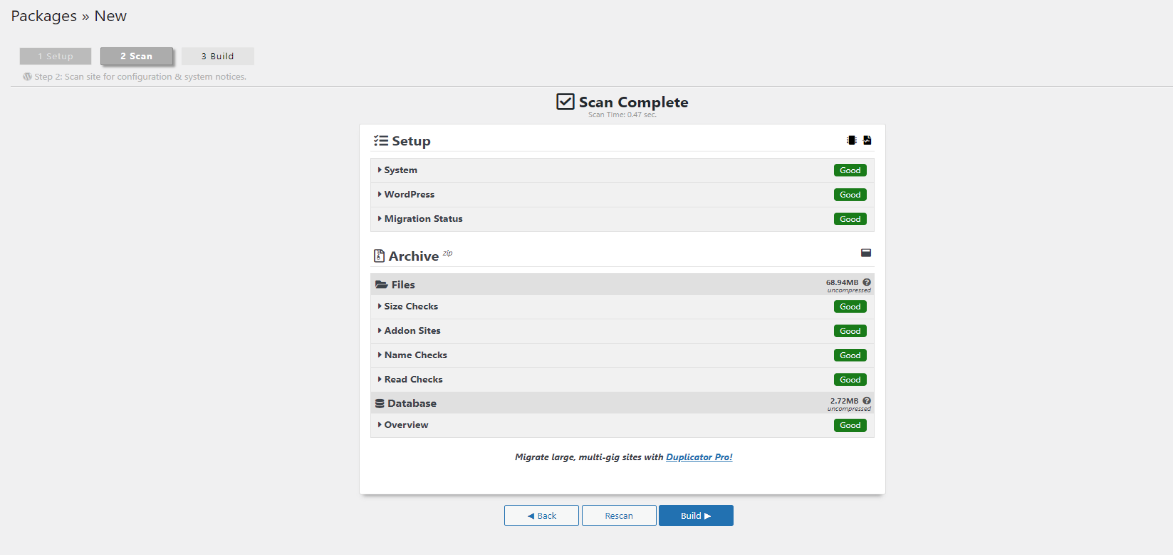
Next, during the Scan step, after clicking “Next,” the scanning process will start. Once it finishes, take a moment to make sure that all the checks show a “Good” status.
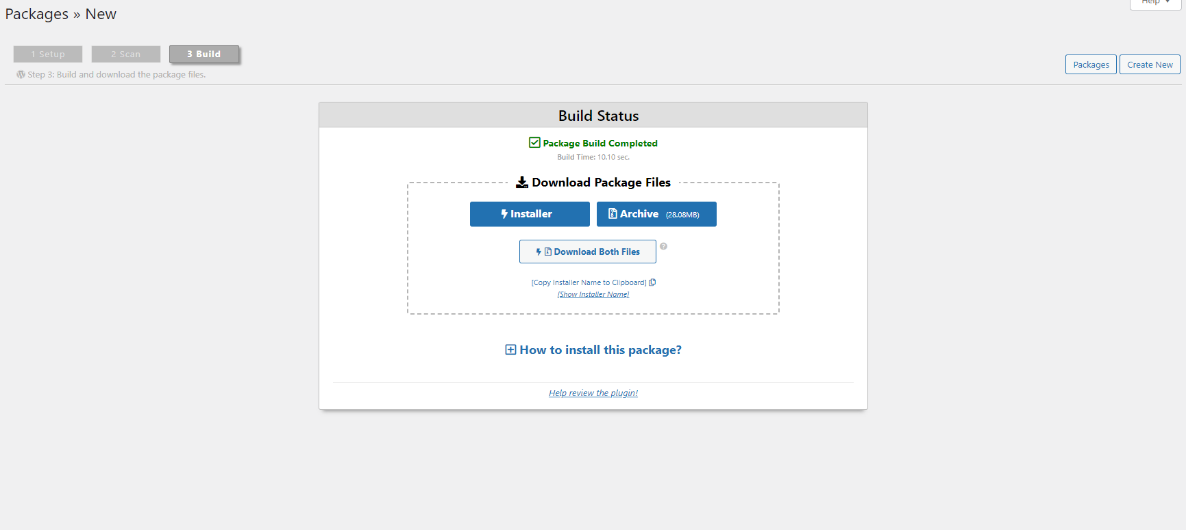
Finally, in the Build phase, assuming everything looks good in the Scan, click on the “Build” button. This action will generate the Duplicator archive for your WordPress website.
Downloading the Duplicator Archive Files
Upon the completion of the package build, you’ll be presented with the option to download the package files. Click on the “Download Both Files” button. The Duplicator archive consists of two files: an installer and a zip archive. You will need both of them to duplicate your WordPress installation.
Step 3: Upload the Archive to Destination
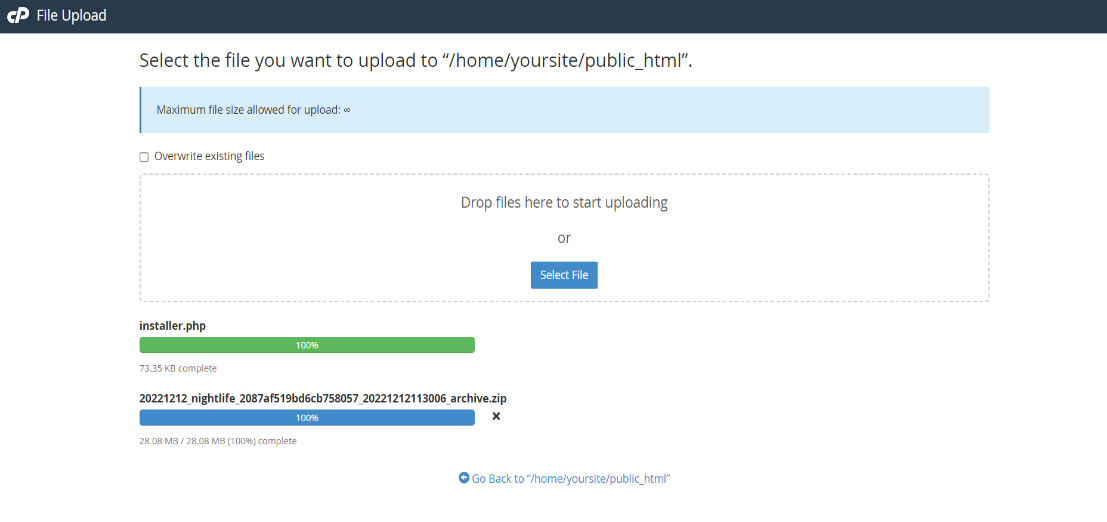
After downloading the Duplicator archive to your computer, the next step is to upload both files to the webroot of the domain where you intend to clone the website. It’s important to ensure that the webroot of the destination domain (in our example, domain.com) is empty before you upload the Duplicator archive files, including the installer file and the zip archive file. You have the option to upload these files using FTP or through the File Manager feature on your control panel.
Step 4: Initiating Deployment with the Installer Script
Loading the Installer Script in a Web Browser
Once the files have been successfully uploaded, you should proceed to load https://destination-domain/installer.php (for example, https://domain.com/installer.php) using a web browser to initiate the deployment of your WordPress website to your new domain.
In case you’re using the same domain name (moving to a new host), you can load yourdomain/installer.php after pointing the domain name to the new host. After calling the installer.php file from the browser, it will automatically redirect to https://domain.com/dup-installer/main.installer.php and display the following page.
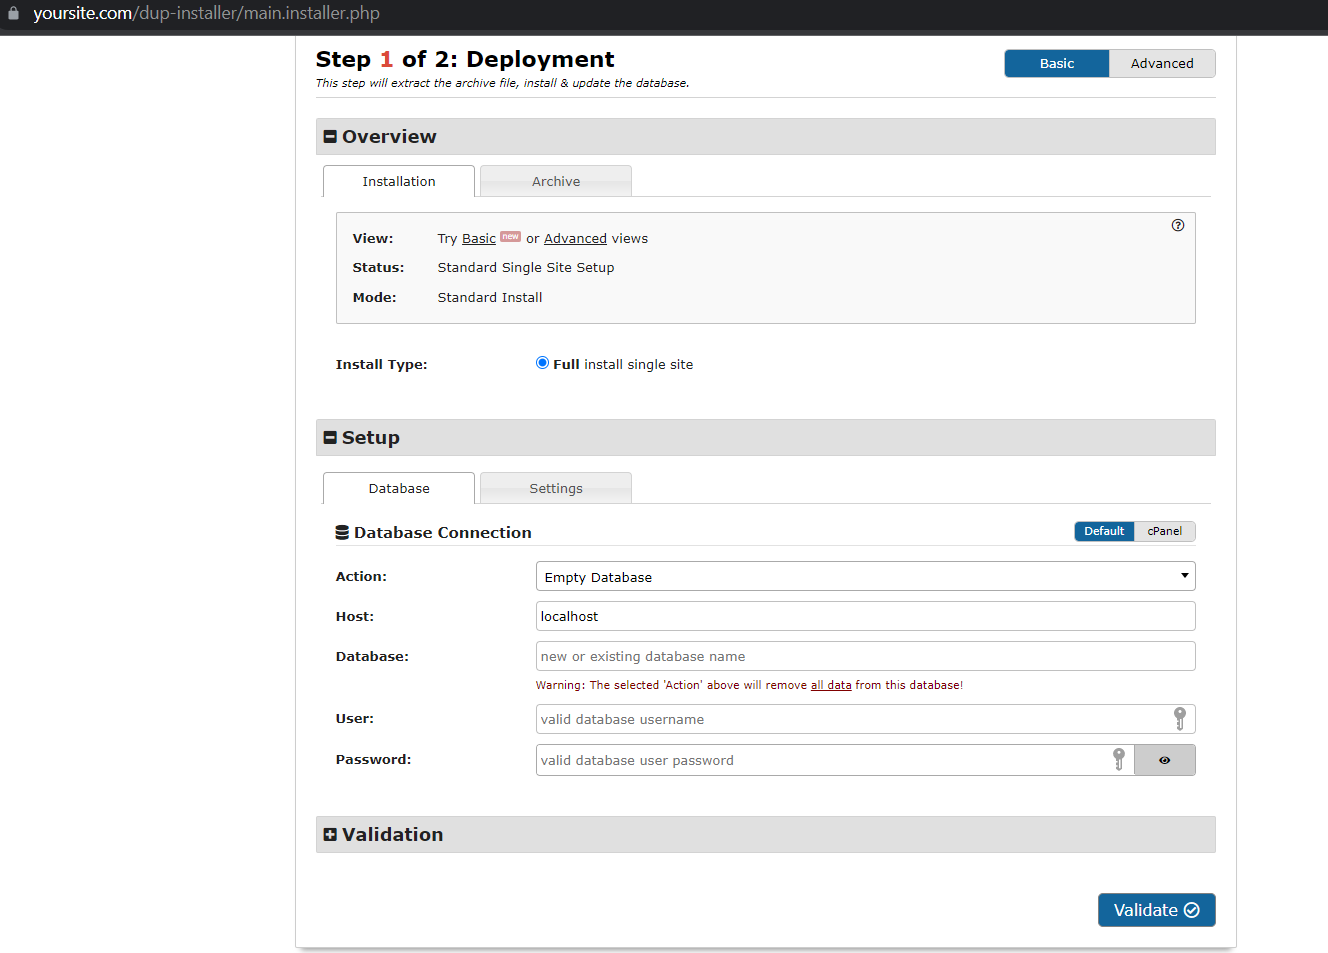
Setting Up New Database
You must create a new database and a database user on the new host. Additionally, please ensure that you grant all privileges to the database user for the new database.
Confirming the Deployment
Now, you should enter the database name, database user name, and password into their respective fields and then click the “Validate” button. If all checks indicate a “Pass” status, you can select the checkbox next to “I have read and accept all terms & notices” and proceed by clicking the “Next” button.

A confirmation screen will appear, displaying a summary including the new domain, new installation path, and the database details. Click on “OK” to proceed. At this point, the process will begin to extract the zip archive to the webroot of the domain and restore the database backup to the new database. If there has been a domain name change, the URLs and the new WordPress installation path in the database will be automatically corrected during this step. Once the deployment is complete, you will be presented with the following screen.

Step 5: Completing the Migration
Logging into the WordPress Admin Dashboard
To complete the migration process, click the “Admin Login” button. This will open the WordPress admin login page in a new tab. Once you’ve successfully logged in to the WordPress admin dashboard, the Duplicator installer files will be automatically removed from the webroot of the domain. However, if you encounter issues and are unable to log in to the WordPress admin dashboard, the installer files will not be removed, posing a potential security risk to your website.
Cleaning Up Installer Files
In such cases, it’s crucial to manually delete the installer files from the webroot of the domain to mitigate any security risks.
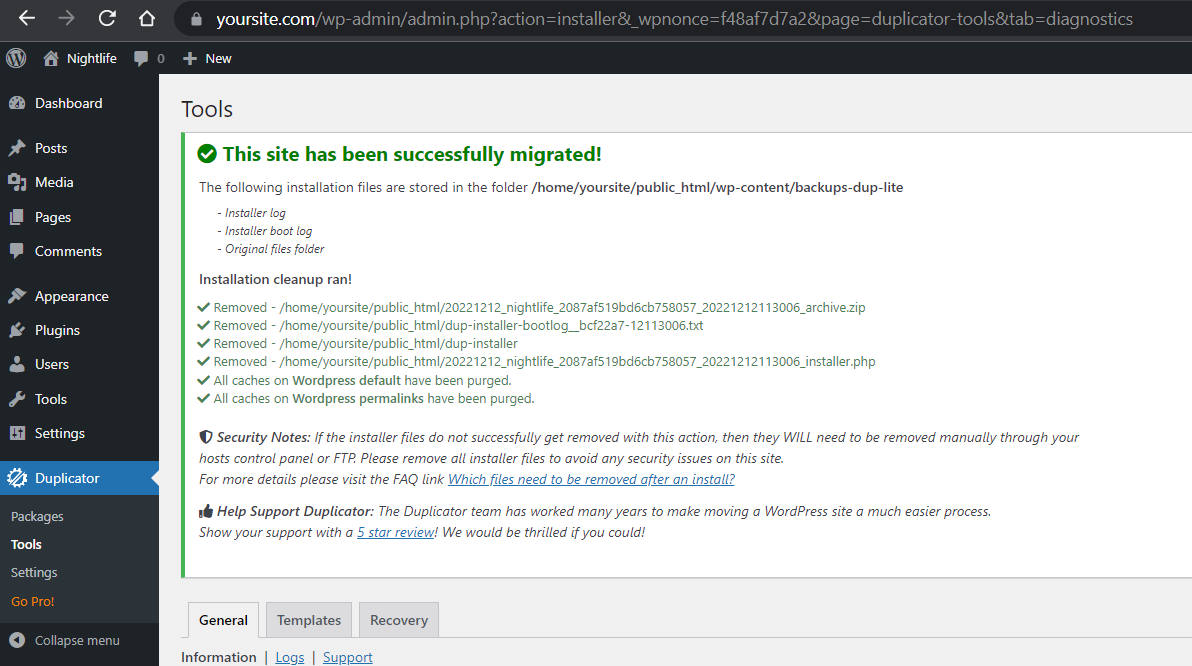
Migration Confirmation
From the above image, you can see that the installer files have been automatically removed when you successfully logged into the wordpress admin dashboard by clicking the “Admin Login” button shown on the previous step.
Now you are all set and you have migrated the wordpress website successfully. Please load the domain from the new host and it will be an exact copy of your domain from your old host!
Conclusion
Migrating your WordPress website away from SiteGround can be a smooth process with the Duplicator plugin. By following these steps, you can seamlessly move your website to a new host or domain, freeing yourself from the constraints of SiteGround’s proprietary control panel. Embrace the simplicity of the Duplicator plugin for hassle-free WordPress migrations. Happy migrating!
Looking for a SiteGround alternative? Consider RackNerd. Check out our server hosting solutions below.