How to Install MongoDB in a Docker Container in Just 5 minutes
Leave a comment on How to Install MongoDB in a Docker Container in Just 5 minutes
Known for its user-friendliness and ease of getting started, MongoDB is popular in modern application development. If you are in search of steps to install MongoDB in a Docker Container in just 5 minutes, then this blog is for you. But before moving on to the steps of installation, let’s begin with an overview of MongoDB.
An Overview of MongoDB
MongoDB is the ultimate choice as a scalable document database these days. It is an open-source, non-relational database management system that is known for its greater flexibility and scalability. It uses JSON-like documents to store data that offer greater versatility compared to traditional relational databases. Also, MongoDB has gained immense popularity globally because it simplifies the process for developers to store, manage, and access data while creating applications using various programming languages.
Unlike other NoSQL databases, and notably more than relational databases, MongoDB’s document-oriented approach makes it incredibly simple to add or modify fields, among other functions. This means that if a developer needs to rapidly adapt an application, MongoDB’s adaptable data model supports this process. Instead of molding an application to conform to specific schema prerequisites, the developer can focus on writing the application itself, with the schema adjusting accordingly.
Features of MongoDB
- Document-Oriented
- Schema-less Design
- Rich Query Language
- Flexible Data Model
Prerequisites
- Access to a command line
- A running Docker instance
Steps to Install MongoDB in a Docker Container
Now you understand why you should use MongoDB. If you are thinking about Docker, then the benefits of using it include features like platform independence, lightweight, easy scaling, load balancing, and resource isolation while using it.
Now it’s time to dive into the six easy steps to install MongoDB in a Docker container.
Step 1 : Ready to Install Docker
Step 2 : Retrieve the MongoDB Docker Image
Step 3 : Launch the MongoDB Image in Docker
Step 4 : Check if the Container is Running
Step 5 : Establish a Connection between MongoDB and Docker Container
Step 6 : Confirm MongoDB Command Execution
Each step is crucial during the installation process, so let’s have a deep understanding of each step.
Step 1: Ready to Install Docker
Before configuring Docker to run the MongoDB instance, make sure to verify the version of Docker to check if it is already installed on your computer. Follow the command below to check the Docker client and server components installed on your system:
# Check docker version
docker version
Step 2: Retrieve the MongoDB Docker Image
As the second step, you need to follow the command below to get the latest image of MongoDB from the Docker Hub repository. To get the specific version of MongoDB, you can specify the particular version.
# Pull latest mongodb image
docker pull mongo:latest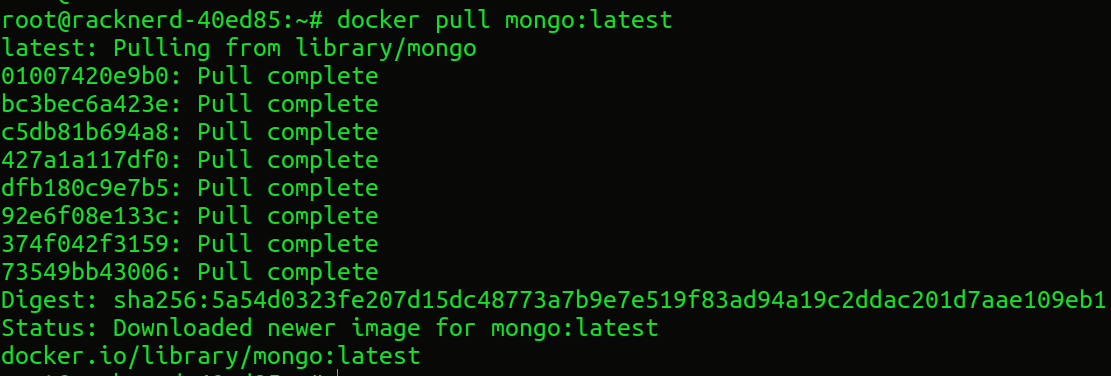
You might be confused about how it works. When you execute this command, Docker will search for the MongoDB image in the Docker Hub registry and download it to your local machine. Additionally, Docker will fetch all the necessary libraries and packages required to run the MongoDB instance within a containerized environment.
Step 3: Launch the MongoDB Image in Docker
In this step, we utilize the Docker run command to initiate a containerized MongoDB instance once the MongoDB image has been fetched. Below is the command to execute the MongoDB image as a container.
# Run MongoDB image as a container
docker run -d --name mongodb -p 27017:27017 mongo
Here, the -d flag launches the container in the background, allowing it to operate in detached mode. Subsequently, the –name option assigns a name to the new container, in this scenario, “mongodb“. Following that, the -p flag facilitates port mapping between the designated port of the container and the corresponding port on the host system. This configuration permits access to the MongoDB instance within the container using the IP address and port number of the host system.
Step 4: Check if the Container is Running
To confirm whether the container is currently active, you can use the docker ps command. This command provides a comprehensive list of all Docker containers that are currently running on the system.
Executing this command will display information about the running containers, including their container IDs, names, statuses, and other details. The command is
# Docker containers list
docker ps
Step 5: Establish a Connection between MongoDB and Docker Container
To connect to the MongoDB shell within the Docker container, utilize the following command:
docker exec –it <conatiner id> or <conatiner name>
Upon execution, Docker initiates a new process within the active mongodb container, launches the MongoDB shell (mongosh), and establishes a connection with the MongoDB instance running inside the container, which facilitates the setup of MongoDB within Docker.
In this command:
- The exec option specifies running a command within an already-executing Docker container.
- The command is executed in interactive mode when the -it option is used.
- “mongodb” is the name of the running container.
- “mongosh” refers to the MongoDB shell that will be executed inside the container.
Subsequently, the MongoDB Shell (mongosh) is launched within the container, which is ready to receive and execute commands.
Step 6: Confirm MongoDB Command Execution
To validate that commands are executing within the Docker container, execute the MongoDB hello command. This crucial step ensures that MongoDB is operational within the Docker container.
# Validation
db.runCommand({hello:1})
The installation of MongoDB on a Docker container is now within your knowledge, and you have acquired the skills necessary to access MongoDB to manage databases.
Docker can be utilized to simplify the deployment of MongoDB databases across numerous servers, thereby enabling you to scale your operations quickly and effectively.