How to Implement Rate Limiting in Nginx for DDoS Protection
Leave a comment on How to Implement Rate Limiting in Nginx for DDoS Protection
Distributed Denial of Service (DDoS) attacks can easily overwhelm your web server with a flood of requests, leading to downtime and degraded performance. Rate limiting is a strategy that limits the number of requests clients can make in a given amount of time. It is one of the best ways to counteract small-scale DDoS or brute-force attacks.
Nginx, being a high-performance web server and reverse proxy, has built-in modules that make implementing rate limiting both simple and efficient. In this guide, we’ll walk you through how to configure rate limiting in Nginx to safeguard your VPS from abusive traffic.
What is Rate Limiting?
Rate limiting is the process of controlling how frequently a client (usually identified by IP address) can make requests to a server. This prevents a single client from overwhelming your system and helps ensure fair resource distribution among all users.
For example, you can allow 10 requests per second per IP and if a client exceeds that, Nginx will delay or reject further requests.
Step 1 – Understand Nginx Rate Limiting Directives
Note: Before proceeding, make sure your server is installed with Nginx. Here we use an Ubuntu
22.04 server.
Nginx provides two main directives for rate limiting:
limit_req_zone : defines a shared memory zone to store request states and sets the rate limit.
limit_req : applies the defined rate limit to a specific location or route.
Step 2 – Define a Rate Limiting Zone
Open your main Nginx configuration file, usually found at /etc/nginx/nginx.conf, and add the following inside the http block:
http {
# Define a zone named ‘one’ with a 10MB shared memory limit # Allow 10 requests per second per IP
limit_req_zone $binary_remote_addr zone=one:10m rate=10r/s;
…
}
Explanation:
$binary_remote_addr : uses the client’s IP as the key for limiting. zone=one:10m : creates a 10MB zone (enough for thousands of IPs). rate=10r/s : sets the request rate to 10 requests per second.
Step 3 – Apply Rate Limiting to a Server Block
Now, inside your website configuration file (e.g., /etc/nginx/sites-available/example.conf), add the following under your server block:
server {
listen 80;
server_name example.com;
location / {
limit_req zone=one burst=20 nodelay; proxy_pass http://localhost:8080;
}
}
Note: If you don’t have a domain name yet, you can use your server’s IP address instead of example.com throughout the configuration.”
Explanation:
limit_req zone=one : applies the limit zone defined earlier.
burst=20 : allows short bursts of up to 20 requests before throttling.
nodelay : rejects requests that exceed the burst limit immediately instead of queuing them.
If you omit nodelay, Nginx will queue extra requests (up to the burst limit) and process them gradually.
Step 4 – Test and Reload Nginx
After making changes, check your configuration for syntax errors:

sudo nginx -t
If no errors are reported, reload Nginx:
sudo systemctl reload nginx
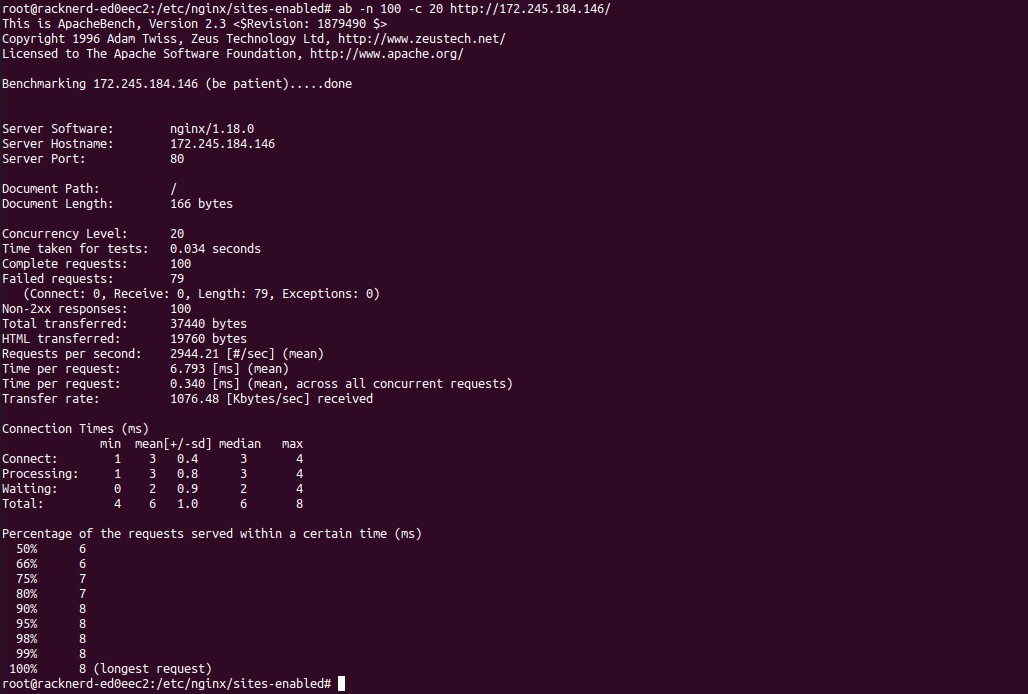
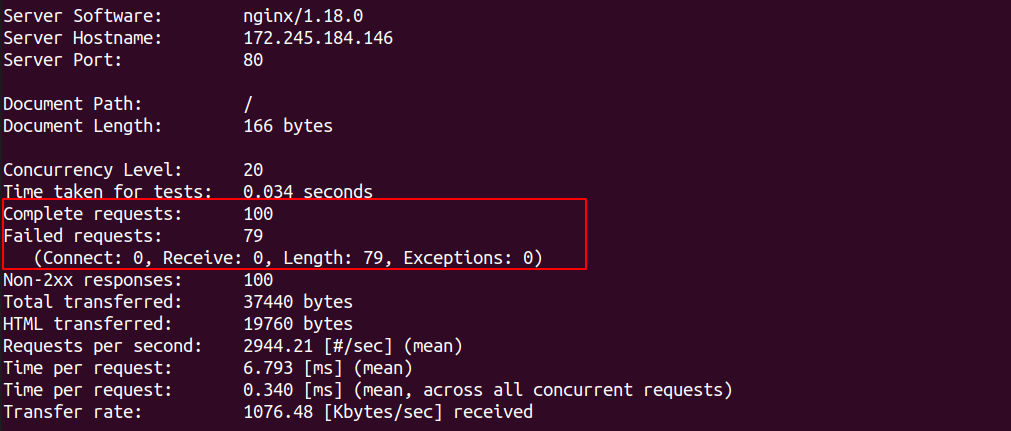
You can then test your rate limit using a tool like ab (Apache Benchmark) or curl:
ab -n 100 -c 20 http://example.com/
If you exceed the limit, Nginx will return: “HTTP/1.1 503 Service Temporarily Unavailable”
Conclusion
Implementing rate limiting in Nginx is a straightforward yet powerful method to mitigate unwanted traffic and reduce the risk of small-scale DDoS attacks. By carefully tuning request and connection limits, you can maintain high availability and ensure legitimate users enjoy a smooth experience even under traffic spikes.
Your Nginx-powered server can be made much more resilient with a few configuration lines; this small change can have a significant impact on your security posture.