How to setup PowerDNS Admin on Linux?
PowerDNS is a free, open-source DNS software that enables you to manage the domain’s DNS conveniently. PowerDNS Admin is a web-based interface that enables you to manage the Domain’s DNS zones using an administrative interface. A set of rich features helps the administrators add, manage, and then update the DNS zones easily without hustling a lot in the long term. Due to its auto PTR record setup, IPv4 and IPv6 support are already helping thousands of users and millions of domains with their DNS management needs. This article will demonstrate how to set up PowerDNS Admin on Linux.
Install Database Server
We will be using the MariaDB database server for the PowerDNS. Run the following commands to install the MariaDB database server,
sudo apt-get update
sudo apt-get upgrade
sudo apt install mariadb-server -y
Once you’re done with installing the database server it’s time to create Database & User for PowerDNS,
Login to database server
sudo mysql -u root
Create a database for an PowerDNS (In our case it is racknerd),
CREATE DATABASE racknerd;
Assign the user and the required privileges to the racknerd database (PowerDNS database),
grant all on racknerd.* to racknerduser@localhost identified by ‘racknerd@123’;
To update the user’s setting flush the privileges using the following command,
FLUSH PRIVILEGES;
We have installed the database server and created the database. The next step is to create the required tables for the PowerDNS database,
Login to database server
sudo mysql -u root
Switch to racknerd databse user using Use command,
USE racknerd;
Run the following commands to create the required tables,
CREATE TABLE domains ( id INT AUTO_INCREMENT, name VARCHAR(255) NOT NULL, master VARCHAR(128) DEFAULT NULL, last_check INT DEFAULT NULL, type VARCHAR(6) NOT NULL, notified_serial INT UNSIGNED DEFAULT NULL, account VARCHAR(40) CHARACTER SET ‘utf8’ DEFAULT NULL, PRIMARY KEY (id) ) Engine=InnoDB CHARACTER SET ‘latin1’; CREATE UNIQUE INDEX name_index ON domains(name); CREATE TABLE records ( id BIGINT AUTO_INCREMENT, domain_id INT DEFAULT NULL, name VARCHAR(255) DEFAULT NULL, type VARCHAR(10) DEFAULT NULL, content VARCHAR(64000) DEFAULT NULL, ttl INT DEFAULT NULL, prio INT DEFAULT NULL, change_date INT DEFAULT NULL, disabled TINYINT(1) DEFAULT 0, ordername VARCHAR(255) BINARY DEFAULT NULL, auth TINYINT(1) DEFAULT 1, PRIMARY KEY (id) ) Engine=InnoDB CHARACTER SET ‘latin1’; CREATE INDEX nametype_index ON records(name,type); CREATE INDEX domain_id ON records(domain_id); CREATE INDEX ordername ON records (ordername); CREATE TABLE supermasters ( ip VARCHAR(64) NOT NULL, nameserver VARCHAR(255) NOT NULL, account VARCHAR(40) CHARACTER SET ‘utf8’ NOT NULL, PRIMARY KEY (ip, nameserver) ) Engine=InnoDB CHARACTER SET ‘latin1’; CREATE TABLE comments ( id INT AUTO_INCREMENT, domain_id INT NOT NULL, name VARCHAR(255) NOT NULL, type VARCHAR(10) NOT NULL, modified_at INT NOT NULL, account VARCHAR(40) CHARACTER SET ‘utf8’ DEFAULT NULL, comment TEXT CHARACTER SET ‘utf8’ NOT NULL, PRIMARY KEY (id) ) Engine=InnoDB CHARACTER SET ‘latin1’; CREATE INDEX comments_name_type_idx ON comments (name, type); CREATE INDEX comments_order_idx ON comments (domain_id, modified_at); CREATE TABLE domainmetadata ( id INT AUTO_INCREMENT, domain_id INT NOT NULL, kind VARCHAR(32), content TEXT, PRIMARY KEY (id) ) Engine=InnoDB CHARACTER SET ‘latin1’; CREATE INDEX domainmetadata_idx ON domainmetadata (domain_id, kind); CREATE TABLE cryptokeys ( id INT AUTO_INCREMENT, domain_id INT NOT NULL, flags INT NOT NULL, active BOOL, content TEXT, PRIMARY KEY(id) ) Engine=InnoDB CHARACTER SET ‘latin1’; CREATE INDEX domainidindex ON cryptokeys(domain_id); CREATE TABLE tsigkeys ( id INT AUTO_INCREMENT, name VARCHAR(255), algorithm VARCHAR(50), secret VARCHAR(255), PRIMARY KEY (id) ) Engine=InnoDB CHARACTER SET ‘latin1’; CREATE UNIQUE INDEX namealgoindex ON tsigkeys(name, algorithm);
To confirm the created tables use the show tables; command to view created tables (make sure that you have selected the PowerDNS database, in our case, i.e., racknerd),
show tables;
It should print the result something like this,
MariaDB [racknerd]> show tables;
+——————–+
| Tables_in_racknerd |
+——————–+
| comments |
| cryptokeys |
| domainmetadata |
| domains |
| records |
| supermasters |
| tsigkeys |
+——————–+
7 rows in set (0.002 sec)
Install PowerDNS
First thing first, for Ubuntu OS, disable the systemd-resolve, which conflicts with the PowerDNS. To disable the systemd-resolve and remove the default resolv.conf and create new resolve.conf file, run the following commands,
sudo systemctl disable systemd-resolved
sudo systemctl stop systemd-resolved
rm -rf /etc/resolv.conf
echo “nameserver 8.8.8.8” > /etc/resolv.conf
Run the following command to install the PowerDNS,
apt-get install pdns-server pdns-backend-mysql -y
Now we have successfully installed the PowerDNS. Next, configure the PowerDNS.
At first stage let us import PowerDNS database schema to the PowerDNS database (In our case i.e., racknerd),
mysql -u racknerduser -p racknerd < /usr/share/pdns-backend-mysql/schema/schema.mysql.sql
Next, we need to create and configure the database connection details in the config file,
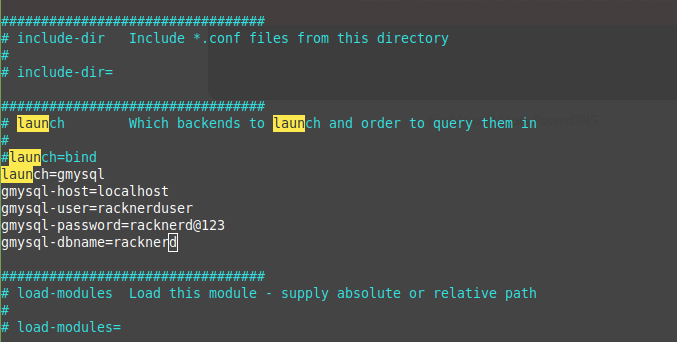
vi /etc/powerdns/pdns.d/pdns.local.gmysql.conf
Paste the following lines into the /etc/powerdns/pdns.d/pdns.local.gmysql.conf file,
# MySQL Configuration
#
# Launch gmysql backend
launch+=gmysql
# gmysql parameters
gmysql-host=127.0.0.1
gmysql-port=3306
gmysql-dbname=racknerd
gmysql-user=racknerduser
gmysql-password=racknerd@123
gmysql-dnssec=yes
# gmysql-socket=
Save the /etc/powerdns/pdns.d/pdns.local.gmysql.conf file and correct the permissions:
chmod 640 /etc/powerdns/pdns.d/pdns.local.gmysql.conf
Let’s test out whether the PowerDNS installation is appropriately completed or not. For that, first stop the PowerDNS server:
systemctl stop pdns
pdns_server –daemon=no –guardian=no –loglevel=9
If everything went correctly, you should be able to see the following result,
Jun 06 14:04:27 gmysql Connection successful. Connected to database ‘racknerd’ on ‘127.0.0.1’.
Jun 06 14:04:27 About to create 3 backend threads for UDP
Jun 06 14:04:27 gmysql Connection successful. Connected to database ‘racknerd’ on ‘127.0.0.1’.
Jun 06 14:04:27 gmysql Connection successful. Connected to database ‘racknerd’ on ‘127.0.0.1’.
Jun 06 14:04:27 gmysql Connection successful. Connected to database ‘racknerd’ on ‘127.0.0.1’.
You can start the PowerDNS service back using following command,
systemctl start pdns
To confirm the service is online, check the listening port of PowerDNS service,
sudo netstat -tap | grep pdns
Output of the above command should look like this,
tcp 0 0 0.0.0.0:domain 0.0.0.0:* LISTEN 34879/pdns_server
tcp 0 0 localhost:47282 localhost:mysql ESTABLISHED 34879/pdns_server
tcp 0 0 localhost:47284 localhost:mysql ESTABLISHED 34879/pdns_server
tcp 0 0 localhost:47286 localhost:mysql ESTABLISHED 34879/pdns_server
tcp 0 0 localhost:47288 localhost:mysql ESTABLISHED 34879/pdns_server
tcp6 0 0 [::]:domain [::]:* LISTEN 34879/pdns_server
Installation of PowerDNS Admin
STEP #1:
To run the application we require PHP and need to install the required packages.
Use the command mentioned below:
[root@ip-172-31-83-151 ~]# sudo yum -y install httpd php php-devel php-gd php-imap php-ldap php-mysql php-odbc php-pear php-xml php-xmlrpc php-mbstring php-mcrypt php-mhash gettext

Now we need to install php-pear package.
[root@ip-172-31-83-151 ~]# sudo yum -y install php-pear-DB

STEP #2:
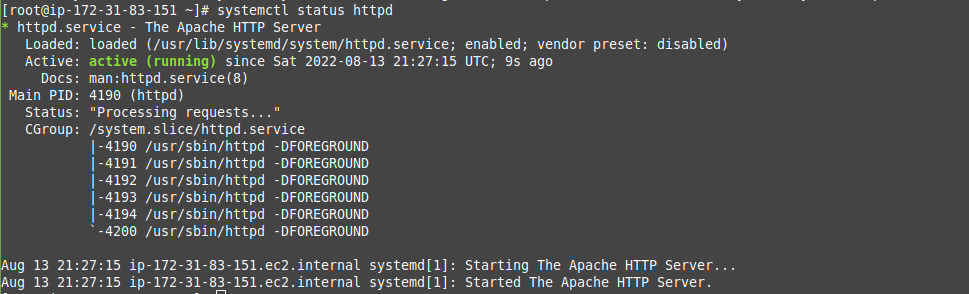
Start and enable Apache service, and check its status.
[root@ip-172-31-83-151 ~]# sudo systemctl start httpd
[root@ip-172-31-83-151 ~]# sudo systemctl enable httpd
Now, check the status using the command:
[root@ip-172-31-83-151 ~]# systemctl status httpd
STEP #3:
Now change the directory to /var/www/html/ and download the Poweradmin package using the command mentioned below:
[root@ip-172-31-83-151 html]# wget http://downloads.sourceforge.net/project/poweradmin/poweradmin-2.1.7.tgz
Now, extract the file using:
[root@ip-172-31-83-151 html]# tar xvf poweradmin-2.1.7.tgz
and then move it to folder poweradmin.
[root@ip-172-31-83-151 html]# mv poweradmin-2.1.7 /var/www/html/poweradmin
STEP #4:
Now call the installation wizard using the server IP from browser as shown below:
http://<your-server-ip>/poweradmin/install
NOTE: During Step #3 of the installation process, you need to enter the database, database user, database password.
In the above step, enter the database user, which here is “racknerduser” and password is “racknerd@123”, and before going to step5, do as said below:
Now you need to create “config.inc.php” file in the location /var/www/html/poweradmin/
So, use the command as shown below:
[root@ip-172-31-83-151 html]# sudo vim inc/config.inc.php
Add the lines as shown above. Now, complete the remaining steps in the installation process, and then once done, you can access your Poweradmin panel using the below browser URL, replacing IP with your server’s IP address:
http://<your-server-ip>/poweradmin/
Congratulations! You have successfully installed and configured PowerDNS Admin on Linux.