How to install Magento in your dedicated Ubuntu server
Leave a comment on How to install Magento in your dedicated Ubuntu server
Magento is one of the most powerful and widely-used e-commerce platforms. With its many capabilities and adaptability, it’s a great option for companies wishing to build a feature-rich online store. This tutorial will assist you in setting up Magento on a dedicated Ubuntu server.
Major Advantages of Magento
Flexibility
Open Source: Being open source, Magento allows for extensive customization and flexibility. Developers can modify the code to fit specific business needs.
Scalability
Magento can handle small to large-scale businesses, making it suitable for startups as well as established enterprises. It is designed to manage thousands of products and high traffic volumes efficiently.
SEO Friendly
Magento offers built-in SEO tools to optimize product pages, URLs, and meta tags, helping improve search engine rankings.
Mobile-Friendly
Magento themes and templates are designed to be mobile-friendly, ensuring a seamless shopping experience on various devices. It supports mobile commerce capabilities, making it easier to reach customers on smartphones and tablets.
Security
Magento offers robust security features, including secure payment gateways, data encryption, and compliance with security standards. Also, it has frequent updates and security patches to address vulnerabilities and enhance the platform’s security.
Installation Steps
Now let’s see how to install Magento on a dedicated Ubuntu server.
Step 1 – Updating System Packages
Update the System Packages using:
sudo apt update

sudo apt upgrade -y
Step 2 – Install LAMP Stack
Here we are installing Apache web server, MySQL for database management, PHP, and its extensions.
sudo apt install apache2 -y sudo apt install mysql-server -y sudo apt install php libapache2-mod-php php-mysql php-xml php-mbstring php-zip php-gd php-curl php-intl php-soap php-bcmath -yApache: sudo apt install apache2 -y

MySQL: sudo apt install mysql-server -y

PHP and its extensions: sudo apt install php libapache2-mod-php php-mysql php-xml php-mbstring php-zip php-gd php-curl php-intl php-soap -y

Step 3 – Configure Apache
Before we start configuring, we need to enable Apache2 to start automatically using the following command:
sudo systemctl enable apache2.service
Confirm that the apache is running and enabled using
sudo systemctl status apache2.serviceNow let’s add a new virtual host configuration for Magento. Create a file named magento.conf in the directory /etc/apache2/sites-available/
sudo vi /etc/apache2/sites-available/magento.confCopy and paste the following line into the file.
Replace “example.com” with your domain name. You can also give your preferred server admin name.
<VirtualHost *:80>
	ServerAdmin [email protected]
	DocumentRoot /var/www/html/magento
	ServerName example.com
	ServerAlias www.example.com
	<Directory /var/www/html/magento>
		Options Indexes FollowSymLinks
		AllowOverride All
		Require all granted
	</Directory>
	ErrorLog ${APACHE_LOG_DIR}/error.log
	CustomLog ${APACHE_LOG_DIR}/access.log combined
</VirtualHost>
Enable the new virtual host and rewrite module:
sudo a2ensite magento.conf

sudo a2enmod rewrite

sudo systemctl restart apache2
Step 4 – Configure MySQL
Restart MySQL and enable it just to make sure it starts and operates when you reboot the server:
sudo systemctl restart mysql.service

sudo systemctl enable mysql.service
Secure the installation
sudo mysql_secure_installation When prompted answer the following like:
- Would you like to setup VALIDATE PASSWORD component? [Y/N] – Y
- Remove anonymous users? [Y/N] – Y
- Disallow root login remotely? [Y/N] – Y
- Remove test database and access to it? [Y/N] – Y
- Reload privilege tables now? [Y/N] – Y
Now enter into MySQL CLI using:
sudo mysql -u root -p Create a database for Magento:
CREATE DATABASE magentodb;Create a new user for the database
CREATE USER 'username'@'localhost' IDENTIFIED BY 'your_password';Please make sure that “your_password” and “username” are replaced with the appropriate ones. Grant privileges using:
GRANT ALL PRIVILEGES ON magentodb.* TO 'username'@'localhost';Flush privileges and exit:
FLUSH PRIVILEGES; EXIT;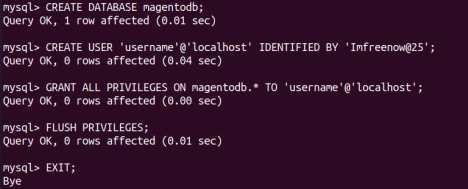
Step 5 – Install Composer
Install Composer and move the composer executable to a worldwide directory that is reachable from anywhere:
curl -sS https://getcomposer.org/installer | php sudo mv composer.phar /usr/local/bin/composer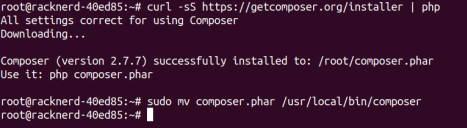
Step 6 – Download and install Magento
Before downloading Magento to the server, access your Adobe Commerce account (create an account if you don’t have any). Go to My Profile >> Access Keys
If there are no keys present, create a new key. After that, you will be able to see a public key and a private key. Then navigate to the web root directory.
cd /var/www/htmlAnd run the following command to download Magento:
sudo composer create-project --repository=https://repo.magento.com/ magento/project-community-edition magentoNote: If you face an error similar to “Do not run Composer as root/super user!”

Create a new user and switch to it:
sudo adduser username

sudo usermod -aG sudo username

sudo chown -R username:username /var/www/html

su - username
Make sure to replace the “username”.
Next, you can run the command to download Magento. You can use the public key from your Adobe Commerce account as the username and the private key as the password.

Step 7 – Install Elasticsearch
Use the following commands to install Elasticsearch
sudo apt update sudo apt install apt-transport-https openjdk-11-jdk -y wget -qO - https://artifacts.elastic.co/GPG-KEY-elasticsearch | gpg --dearmor | sudo tee /usr/share/keyrings/elasticsearch-keyring.gpg echo "deb [signed-by=/usr/share/keyrings/elasticsearch-keyring.gpg] https://artifacts.elastic.co/packages/7.x/apt stable main" | sudo tee /etc/apt/sources.list.d/elastic-7.x.list sudo apt update sudo apt install elasticsearch -yAfter completing the installation, start and enable Elasticsearch.
sudo systemctl start elasticsearch

sudo systemctl enable elasticsearch
Check the status using the command
sudo systemctl status elasticsearchStep 8 – Security Permissions
Adjust the permissions for security. Use the following commands:
sudo chown -R www-data:www-data /var/www/html/magento sudo find /var/www/html/magento -type d -exec chmod 755 {} \; sudo find /var/www/html/magento -type f -exec chmod 644 {} \; sudo chmod -R 777 /var/www/html/magento/var /var/www/html/magento/pub/static /var/www/html/magento/generated /var/www/html/magento/pub/mediaStep 9 – Run the Magento setup script
Run the Magento setup script, making sure to replace the placeholder details with your specific information:
sudo php bin/magento setup:install --base-url=http://example.com/ --db-host=localhost --db-name=magentodb --db-user=username --db-password=your_password --admin-firstname=Admin --admin-lastname=User [email protected] --admin-user=admin --admin-password=admin123 --language=en_US --currency=EUR --timezone=Europe/Paris --use-rewrites=1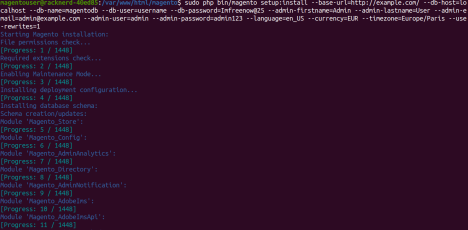
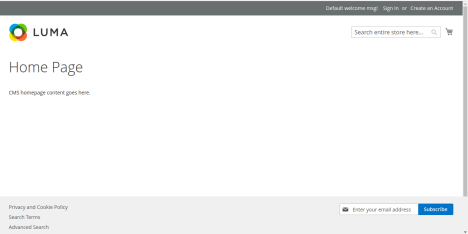
The installation is now complete. You can access the website by visiting http://yourdomain.com in your web browser. To reach the admin dashboard, go to http://yourdomain.com/admin.
Conclusion
The process of installing Magento on your dedicated Ubuntu server is methodical and starts with setting up the server environment and making sure it satisfies all prerequisites. The Magento package must be downloaded and extracted before the databases can be created and installed. This is done after Apache, MySQL, and PHP have been installed and configured. Ongoing seamless operation is ensured via routine backups, updates, and monitoring. With this configuration, your Magento store on Ubuntu guarantees a safe and scalable platform, and it also gives you the ability to offer a flawless shopping experience while keeping control over the expansion and performance of your e-commerce company.