How to Install Joomla on Your Dedicated Ubuntu Server
Leave a comment on How to Install Joomla on Your Dedicated Ubuntu Server
Joomla is a free and open-source content management system (CMS) used for creating and managing websites. Because it is written in PHP and is based on the model-view-controller (MVC) framework, it may be used with a variety of databases, including MySQL, PostgreSQL, and SQLite. Joomla is a well-liked option for developing websites, blogs, intranets, and e-commerce applications because of its adaptability, extensibility, and user-friendliness.
The installation on the Ubuntu server requires a LAMP or LEMP stack. Here, we use the LAMP stack for the installation. Which consists of Linux 22.04, Apache Web Server, MySQL database server, and PHP.
How to Install Joomla in ubuntu server
Step 1 – Updating System Packages
Update all the System Packages first using:
sudo apt update

sudo apt upgrade
Step 2 – Install Apache Web Server
sudo apt install apache2
Step 3 – Install MySQL server
sudo apt install mysql-server
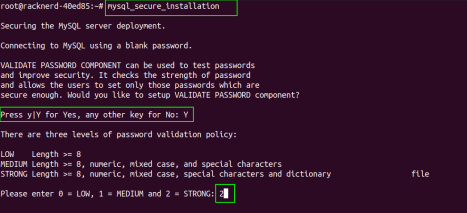
After the installation is completed, we need to secure it.
For that, we use the sudo mysql_secure_installation command.
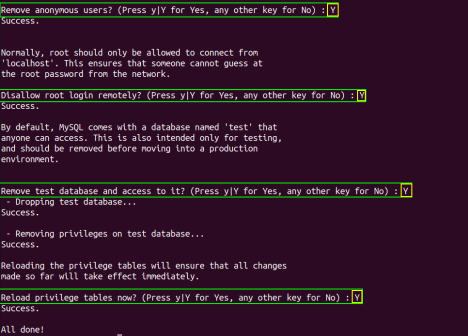
This will prompt the following questions:
- Would you like to set up VALIDATE PASSWORD component? [Y/N] – Y
- Remove anonymous users? [Y/N] – Y
- Disallow root login remotely. [Y/N] – Y
- Remove the test database and access to it. [Y/N] – Y
- Reload privilege tables now? [Y/N] – Y
Step 4 – Create a Database and Database user for Joomla
For that access the MySQL CLI using: sudo mysql -u root -p
Then follow these steps:
- Create a Database:
CREATE DATABASE joomla_db; - Create a Database user:
CREATE USER 'joomla_user'@'localhost' IDENTIFIED BY 'password'; - Grant Privileges to the User:
GRANT ALL PRIVILEGES ON joomla_db.* TO 'joomla_user'@'localhost'; - Flush Privileges:
FLUSH PRIVILEGES; - Exit MySQL:
EXIT;
Note: You can replace “joomla_db” and “joomla_user” with your preferred database name and username. Also, replace the “password” with a stronger one.
Step 5 – Install PHP
Joomla is written in PHP. So we must install PHP and its required modules. For that, use the following command:
sudo apt install php libapache2-mod-php php-mysql php-cli php-mbstring php-json php-curl php-gd php-xml php-zip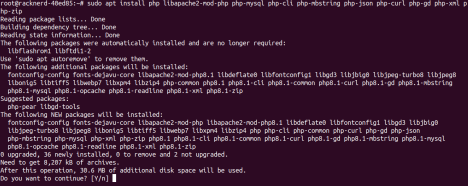
Step 6 – Download and Install Joomla
Before downloading Joomla, change the current directory to /tmp
cd /tmpDownload Joomla. Here we are downloading Joomla version 4.2.3
wget https://downloads.joomla.org/cms/joomla4/4-2-3/Joomla_4-2-3-Stable-Full_Package.zip?format=zip
This will download the Joomla package “Joomla_4-2-3-Stable-Full_Package.zip?format=zip”. Now unzip this file and move the file to the directory /var/www/html/joomla
Note: Install unzip If not already installed, run apt-get -y install unzip
Create the directory /var/www/html/joomla. Using: mkdir /var/www/html/joomla
sudo unzip Joomla_4-2-3-Stable-Full_Package.zip?format=zip -d /var/www/html/joomlaNow we want to create a .htaccess file. Here, the Joomla installation already comes with a file “htaccess.txt”. So we can copy this file to .htaccess.
sudo cp /var/www/html/joomla/htaccess.txt /var/www/html/joomla/.htaccessNow change the ownership of the Joomla files to the Apache user.
chown -R www-data.www-data /var/www/html/joomla chmod -R 755 /var/www/html/joomlaStep 7 – Configuring Apache for Joomla
Create an Apache virtual host configuration file.
vi /etc/apache2/sites-available/joomla.confAdd the following:
<VirtualHost *:80>
	ServerAdmin admin@your_domain.com
	DocumentRoot /var/www/html/joomla/
	ServerName your_domain.com
	ServerAlias www.your_domain.com

	<Directory /var/www/html/joomla/>
		Options FollowSymlinks
		AllowOverride All
		Require all granted
	</Directory>

	ErrorLog ${APACHE_LOG_DIR}/error.log
	CustomLog ${APACHE_LOG_DIR}/access.log combined
</VirtualHost>
Save and close the file.
Enable the Joomla site and reload Apache using:
sudo a2ensite joomla.conf sudo systemctl reload apache2Step 8 – Complete Joomla installation
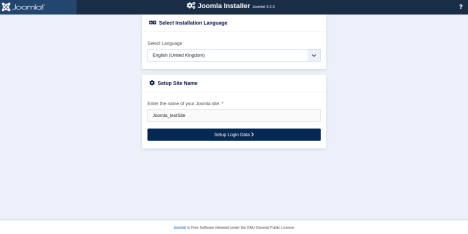
Open your browser and input the URL “http://yourdomain.com/joomla” to open up the Joomla installer. Replace “yourdomain.com” with your domain name or the public IP address of your server.
Select the language and enter the ‘Site Name’. Then, to continue, click “Setup Login Data”.
So the next Login Data page will appear. Fill in all the fields.

Once the login data has been completed, click “Setup Database Connection.” The page for creating the database connection will open as a result. Here, enter the database name, user name, and password. Make sure the data you enter here is the same as that we created in step 4. Then click on “Install Joomla.”

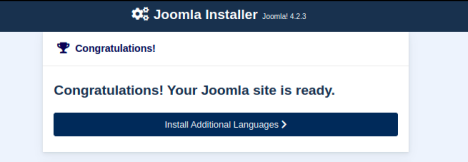
Now the installation is complete.
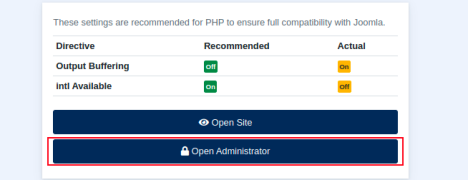
Click on “Open Administrator” to continue.
This will open the Joomla Administrator Login page for the domain.
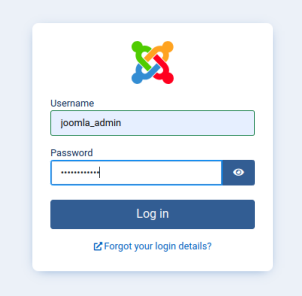
Enter the Joomla user name and password to continue.
And the Joomla dashboard will appear.

Conclusion
Installing Joomla on a dedicated Ubuntu server can transform your website development experience by leveraging the power and flexibility of one of the most popular content management systems available. By following this guide, you’ve set up a robust LAMP stack, configured your server environment, and installed Joomla, ready to manage your content efficiently.
With Joomla’s extensive range of features and extensions, you can tailor your website to meet specific needs, whether you’re creating a personal blog, a corporate website, or an e-commerce platform. Remember to regularly update your Joomla installation and its components to ensure security and optimal performance.