How to Install and Configure GitLab on a VPS
Leave a comment on How to Install and Configure GitLab on a VPS
GitLab is a powerful web-based DevOps lifecycle tool that provides a Git repository manager with features like CI/CD, issue tracking, code reviews, and more. If you’re managing a small team or a personal project and want full control over your code, hosting GitLab on your own VPS (Virtual Private Server) is a great option.
Here we use a Ubuntu 22.04 server for installation.
Step 1 – Update Your System
Update all the System Packages to make sure your Ubuntu server is up-to-date. (This may take a few minutes to complete)
sudo apt update && sudo apt upgrade -y
Also, install some essential dependencies:
sudo apt install -y curl ca-certificates tzdata perl
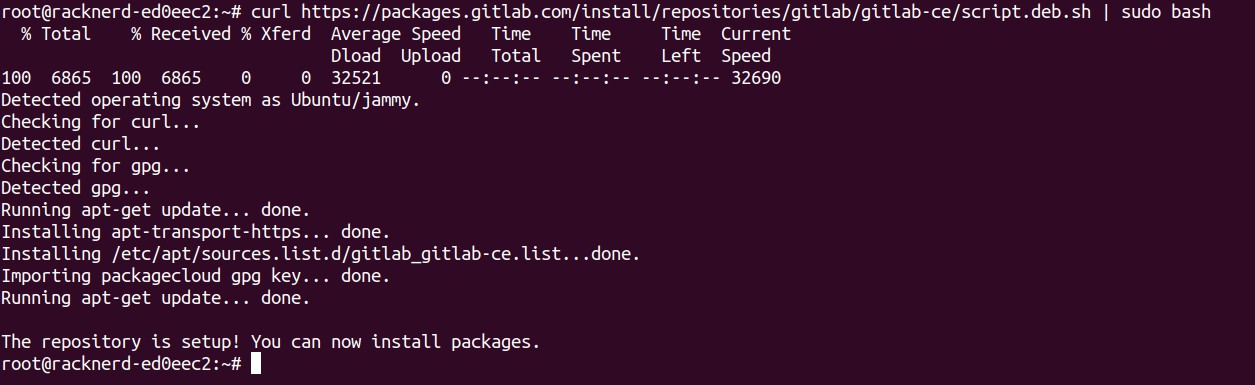
Step 2 – Add the GitLab Repository
Install GitLab using the official Omnibus package. First, download the script:
curl https://packages.gitlab.com/install/repositories/gitlab/gitlab-ce/script.deb.sh | sudo bash
Note: If you prefer the Community Edition over the Enterprise Edition, use gitlab-ee with gitlab-ce.
Step 3 – Install GitLab
Now, install GitLab using the domain name you’ve set up.
sudo EXTERNAL_URL=”https://gitlab.yourdomain.com” apt install gitlab-ce
Replace gitlab.yourdomain.com with your actual domain or public IP if you’re not using a domain.
Step 4 – Configure GitLab
Once installed, GitLab needs to be configured. Run the following command:
sudo gitlab-ctl reconfigure
GitLab is set up and all required services are started with this command.
If you have a firewall, make sure that the HTTP and HTTPS ports are open.
sudo ufw allow http sudo ufw allow https
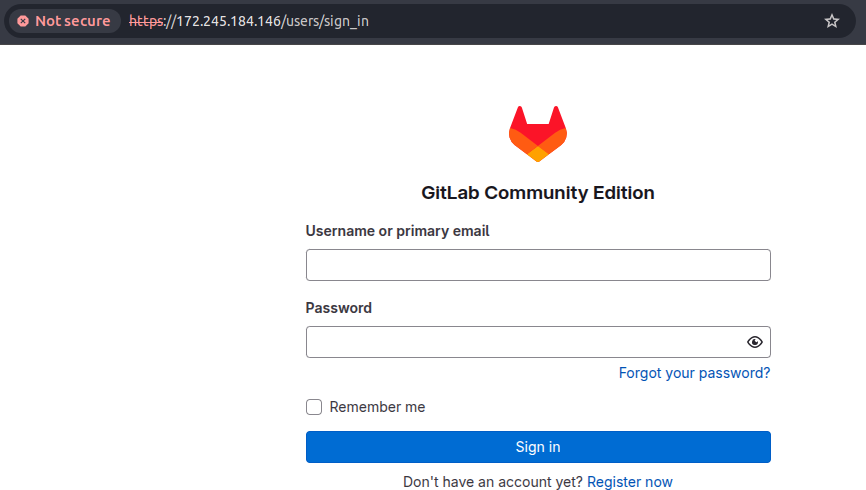
Step 5 – Access GitLab in Your Browser
Now open your browser and visit: “https://gitlab.yourdomain.com”
The first time you visit, GitLab will prompt you to set a password for the root user. After that, you can log in and begin using the platform.
Step 6 – Configure Email (Optional but Recommended)
To enable email notifications, edit the GitLab configuration:
sudo nano /etc/gitlab/gitlab.rb
Find and update the SMTP section:
gitlab_rails[‘smtp_enable’] = true gitlab_rails[‘smtp_address’] = “smtp.your-email-provider.com” gitlab_rails[‘smtp_port’] = 587
gitlab_rails[‘smtp_user_name’] = “[email protected]” gitlab_rails[‘smtp_password’] = “yourpassword” gitlab_rails[‘smtp_domain’] = “yourdomain.com” gitlab_rails[‘smtp_authentication’] = “login” gitlab_rails[‘smtp_enable_starttls_auto’] = true
Then reconfigure GitLab:
sudo gitlab-ctl reconfigure
Step 7 – Set Up a Git Repository
Once logged in, you can:
- Create a new project
- Push code from your local machine using Git
- Enable CI/CD pipelines Example Git setup:
git init
git remote add origin https://gitlab.yourdomain.com/username/project.git git add .
git commit -m “Initial commit” git push -u origin master
Conclusion
Running GitLab on your VPS provides you with complete control over your code and project management tools. This self-hosted option can grow with your requirements while safeguarding your codebase.
To maintain stability and reliability, remember to regularly update your VPS, monitor its performance, and take regular backups.