How to Link a Domain Name to Your Server IP with LOMP Stack
Leave a comment on How to Link a Domain Name to Your Server IP with LOMP Stack
Having a professional domain name is one of the most important steps in building a credible online presence. Instead of using a numeric IP address, linking your domain name to your server’s IP allows visitors to easily access your website through a recognizable and branded URL.

In this guide, we’ll walk through how to link a domain name to your server IP using the LOMP stack (Linux, OpenLiteSpeed, MariaDB, and PHP) on AlmaLinux OS. By the end, your domain will be connected to your web server and properly redirect traffic to your WordPress site hosted on LOMP.
Why Link a Domain Name to Your Server?
Connecting a domain name to your server not only enhances accessibility but also boosts your professional image and SEO. Here are a few key benefits:
- Brand identity: Replace hard-to-remember IPs with a clean, branded URL.
- User trust: Visitors are more comfortable browsing a site with a recognizable domain.
- SEO improvement: Search engines prefer domain-based URLs over raw IP addresses.
- Easy redirection: Configure your domain to handle both www and non-www versions of your website.
If you haven’t set up the LOMP stack yet, check out our “Automatically Install WordPress with LOMP or OpenLiteSpeed (One-Line Code)” tutorial before proceeding.
Prerequisites
Before you begin, make sure you have the following ready:
- A domain name registered (you can order one at RackNerd.com).
- A VPS or dedicated server running LOMP (OpenLiteSpeed + WordPress).
- Root access to your server.
- Your server’s IP address on hand.
Step-by-Step: Link Your Domain to Your Server IP (LOMP Stack)
Step 1: Point Your Domain to Your Server IP
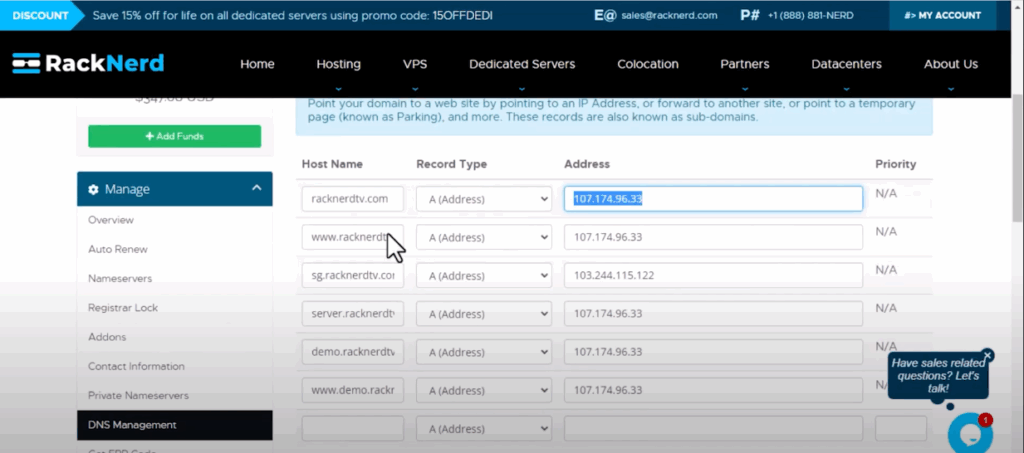
Go to your domain registrar’s DNS Management Panel.
Create the following DNS records to point your domain to your VPS:
| Record Type | Host | Value |
| A Record | @ | Your server IP address |
| A Record | www | Your server IP address |
Save your DNS changes and allow propagation (this may take a few minutes up to a few hours).
Step 2: Log in to OpenLiteSpeed WebAdmin Console
Next, we’ll configure OpenLiteSpeed to recognize your domain.
Open your web browser and navigate to:
http://your-server-ip:7080
Log in using the admin credentials you created when installing the LOMP stack.
Step 3: Edit Virtual Host Settings
Once logged in:
- Go to Virtual Hosts in the left-hand menu.
- Under the Security tab, set the Restrained option to YES and click Save.
- Now open the General tab and configure the following fields:
- Document Root: Path to your WordPress directory (e.g., /usr/local/lsws/Example/html).
- Domain Name: Enter your main domain (e.g., domain.com).
- Aliases: Add www.domain.com.
- Save the settings when done.
This tells OpenLiteSpeed which domain to serve your WordPress files from.
Step 4: Link Your Domain to HTTP and HTTPS Ports
Now, we’ll link your domain to standard web server ports.
- Go to Listeners → View/Edit → port 80 (HTTP).
- Under Virtual Host Mappings, replace the Domain field value with your domain and IP address.
Example:
domain.com, www.domain.com, your-server-ip
- Repeat the same for port 443 (HTTPS) if you have SSL enabled.
- Click Save for both configurations.
Step 5: Restart OpenLiteSpeed Server
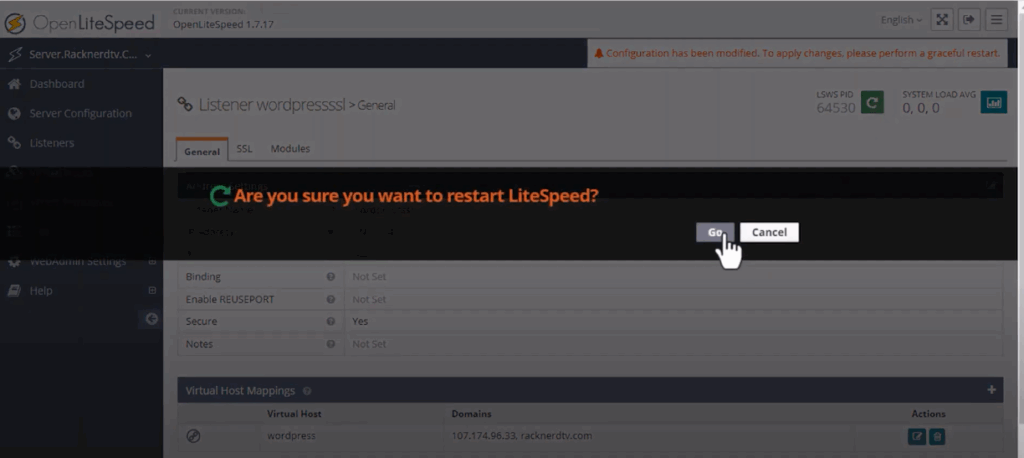
After editing configurations, apply your changes by restarting the web server or use your terminal:
systemctl restart lsws
This ensures all recent edits take effect.
Step 6: Update WordPress URL Settings
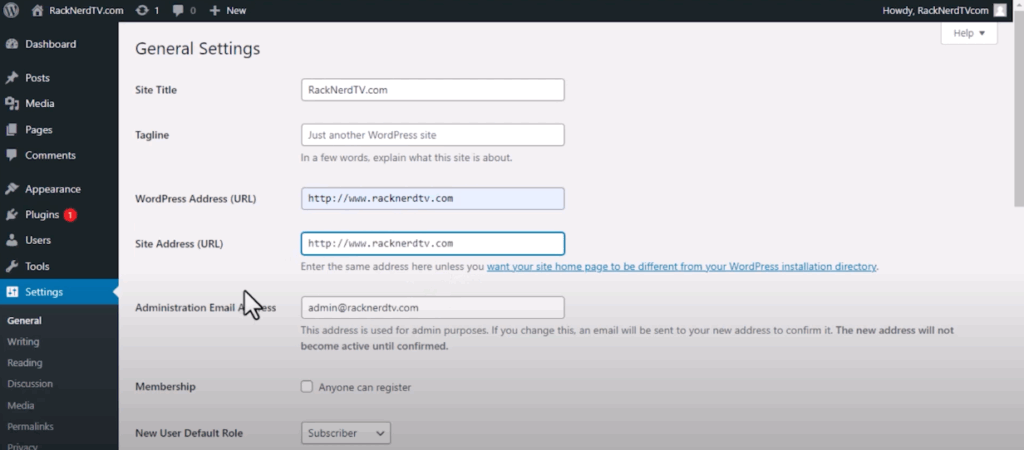
Next, update WordPress to recognize your new domain.
- Log in to your WordPress Admin Dashboard.
- Navigate to Settings → General.
- Update the WordPress Address (URL) and Site Address (URL) to your domain (e.g., https://www.domain.com).
- Save changes.
Now WordPress will redirect all traffic from the old IP to your new domain.
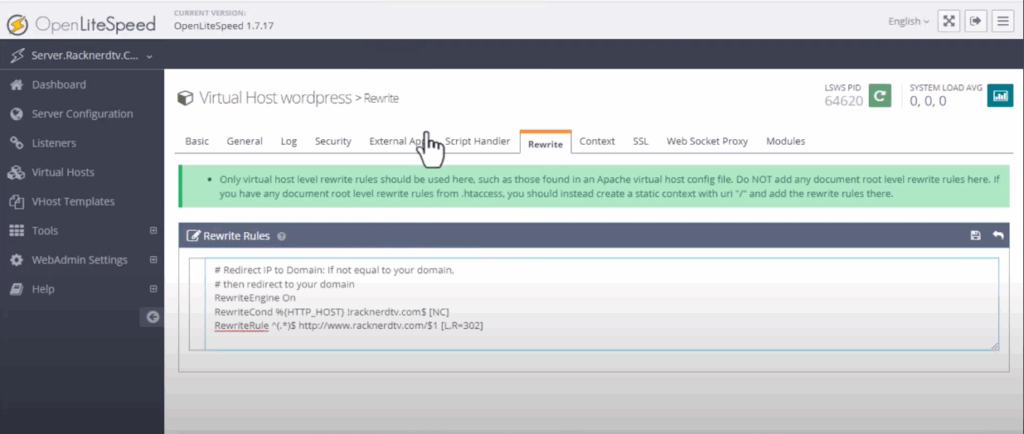
Step 7: Add Rewrite Rules for IP Redirection
If visitors access your site via the server IP instead of the domain, you can force a redirect using rewrite rules.
In the OpenLiteSpeed WebAdmin Console:
- Go to Virtual Hosts → Rewrite tab.
- Under Rewrite Rules, paste the following code:
RewriteEngine On
RewriteCond %{HTTP_HOST} ^your-server-ip
RewriteRule (.*) http://www.domain.com/$1 [R=301,L]
Replace your-server-ip and domain.com with your actual details.
Click Save, then restart the web server again:
systemctl restart lsws
Now, anyone accessing your server IP will be redirected automatically to your domain name.
Step 8: Verify Your Setup
Finally, open your browser and visit your domain:
http://domain.com
or
https://www.domain.com
Your website should load properly with the domain name.
If you try accessing your IP address directly, it should redirect to your domain — confirming that everything is linked correctly.
Quick Reference Table
| Step | Action | Purpose |
| Step 1 | Add A Records in DNS | Point domain to your server IP |
| Step 2 | Log in to http://server-ip:7080 | Access OpenLiteSpeed WebAdmin |
| Step 3 | Edit Virtual Host | Assign document root and domain name |
| Step 4 | Configure Listeners (Ports 80 & 443) | Link domain to web ports |
| Step 5 | systemctl restart lsws | Restart server to apply settings |
| Step 6 | Update WordPress URLs | Reflect new domain in WordPress |
| Step 7 | Add Rewrite Rules | Redirect IP to domain |
| Step 8 | Test domain.com | Verify configuration success |
FAQs
❓ How long does DNS propagation take?
It typically takes between 10 minutes and 24 hours for DNS changes to fully propagate, depending on your registrar.
❓ Can I use this method for multiple domains?
Yes. Repeat the same Virtual Host configuration steps for each domain you want to add.
❓ Do I need SSL before linking the domain?
No. However, once your domain is connected, you can install a free SSL using Let’s Encrypt for added security.
❓ What if my domain still points to the IP?
Try clearing your DNS cache or using a global DNS checker to confirm propagation is complete.
❓ Can I automate the redirection setup?
Yes. Once configured properly in OpenLiteSpeed, these rewrite rules handle redirection automatically.
Conclusion
Congratulations! You’ve successfully linked your domain name to your server IP using LOMP Stack on AlmaLinux OS. Visitors can now reach your website using your branded domain instead of your raw IP address — improving both professionalism and SEO.
At RackNerd, we make web hosting simpler with powerful VPS and dedicated server solutions optimized for WordPress, OpenLiteSpeed, and other web stacks. Explore our plans today at RackNerd.com.